Table of Contents
Ever dreamed of wielding scissors like a salon pro? Before you unleash your inner stylist on a friend's head (and potentially cause a hair-raising disaster!), there's a surprisingly effective way to hone your skills: practicing with paper! This article is your ultimate guide to mastering the art of "how to practice cutting hair on paper." We'll walk you through everything from gathering the right tools and mastering basic cuts to tackling more advanced techniques like layering and creating realistic hairstyles. Think of paper as your blank canvas—a low-stakes, low-cost way to experiment with different shapes, angles, and textures. We'll cover essential techniques so you can build your confidence and precision before ever touching a strand of real hair. Get ready to transform your paper into stunning works of art, and, more importantly, prepare yourself for the real deal. By the end, you’ll be amazed at how much you’ve learned and how much more confident you feel about your future hair-cutting adventures. So grab your scissors and some paper—let's get started!
Getting Started: Tools and Techniques
Getting Started: Tools and Techniques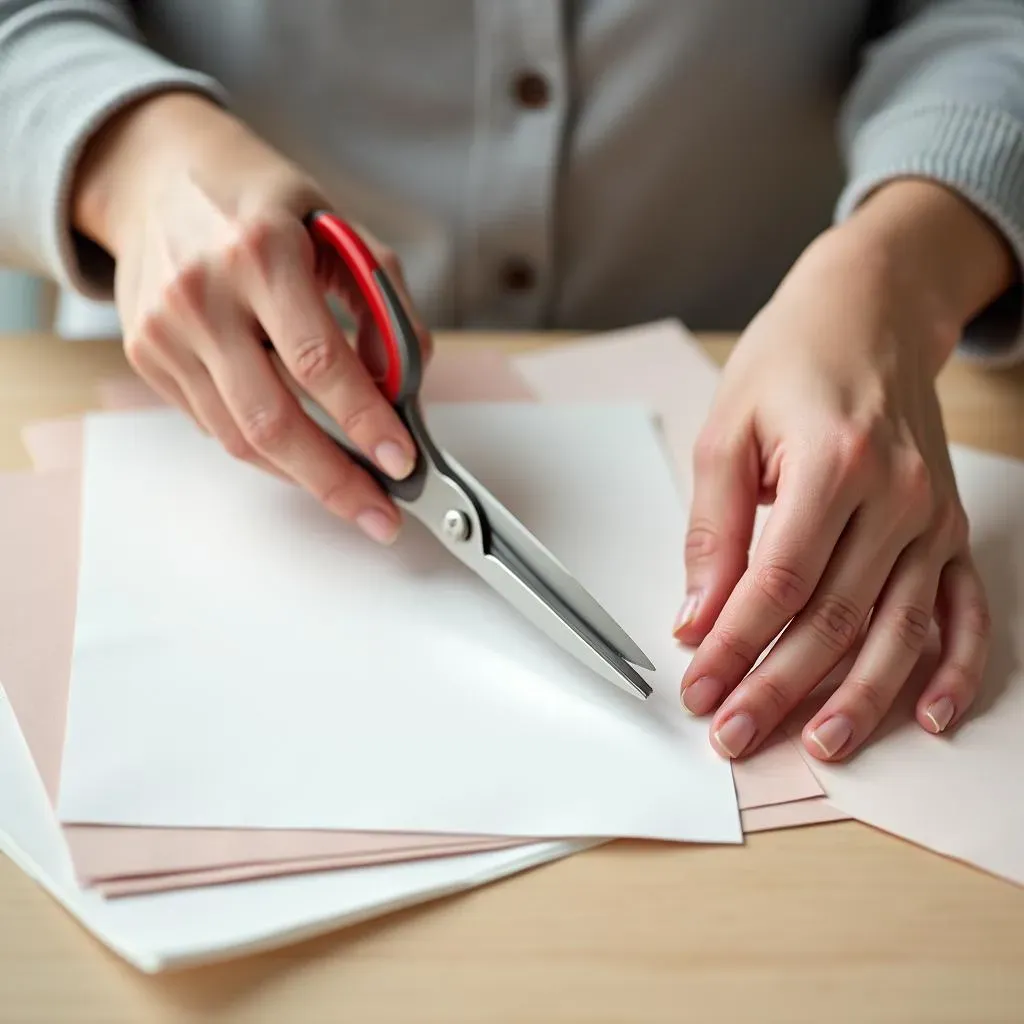
Choosing Your Scissors
First things first: You'll need a good pair of scissors. Don't grab those dull, old craft scissors lurking in your junk drawer. For best results, look for sharp, lightweight scissors designed for detail work. These will give you much more control and precision when cutting intricate shapes and lines, mimicking the feel of actual hair-cutting shears. Think of them as your trusty artist's tools; the sharper they are, the cleaner your lines will be. You can find affordable options at most craft stores. If you're serious about this, investing in a decent pair of hair-cutting shears is worth considering, though for practice paper is a fantastic, low-risk option. Remember, a good pair of scissors is an investment that will last, so don't skimp!
Before you even begin, make sure you know how to handle your scissors safely. Learn the proper grip and cutting techniques to avoid accidents. This is crucial whether you're cutting paper, fabric, or hair. Check out our guide on choosing the best scissors for more detailed information.
- Sharp, lightweight scissors
- Practice safe scissor handling
- Consider hair-cutting shears (optional)
Selecting Your Paper
Next, you need to choose your paper wisely. While any paper will do for basic practice, different types offer different challenges and rewards. Thicker paper, like cardstock, is great for practicing precise cuts and getting a feel for controlling the scissors. It’s more resistant, so you'll develop more strength and control. Thinner paper, such as printer paper, is better for practicing quick, flowing cuts and creating more delicate shapes. Experiment with both to see which you prefer! Think of this as a chance to find what works best for you, like finding your perfect hair-cutting technique. Different papers simulate different hair textures and densities, so this is a key step. Consider the weight and texture of the paper as you choose. This is crucial for replicating different hair types and densities.
Don't limit yourself to plain white paper, either! Colored paper, patterned paper, or even textured paper can make the practice more engaging and fun. You can even use different types of paper to represent different hair textures. For example, try using crepe paper to simulate curly hair, or tissue paper for fine hair. Check out this article for more ideas on types of paper you can use.
Paper Type | Benefits | Hair Texture Analogy |
|---|---|---|
Cardstock | Precise cuts, strength training | Thick, coarse hair |
Printer Paper | Fluid cuts, delicate shapes | Fine, straight hair |
Crepe Paper | Simulates curly texture | Curly hair |
Basic Cuts: From Straight Lines to Curves
Basic Cuts: From Straight Lines to Curves
Mastering the Straight Cut
Let's start with the fundamentals: the straight cut. This might seem simple, but it's the foundation for many more complex hairstyles. Practice cutting straight lines of varying lengths across your paper. Focus on keeping your scissors parallel to the paper and maintaining a consistent speed. Imagine you're cutting a perfectly straight fringe—smooth, even, and precise. The key here is consistency. Try cutting different widths of lines to build up your control and precision. This is like learning to cut a bob; a straight cut is essential for achieving a neat and even finish.
As you become more comfortable, try varying the pressure you apply to the scissors. A lighter touch creates a more delicate cut, while firmer pressure results in a bolder line. Experiment to see how different pressures impact the overall look. This is similar to texturizing hair; you can create different effects by adjusting the pressure of your shears. For more tips on achieving the perfect straight cut, check out our guide on basic paper cutting techniques.
- Practice cutting straight lines of varying lengths.
- Maintain a consistent speed and pressure.
- Experiment with varying pressure for different effects.
Adding Curves and Angles
Once you’ve mastered straight lines, it’s time to add some curves! Start by drawing simple curved lines on your paper. Practice cutting along these curves, focusing on keeping your cuts smooth and consistent. Don't be afraid to experiment with different curves – gentle, sweeping curves, sharp, angular curves – to see what you can create. Think of this as learning to cut layers in hair; curves add dimension and movement. It's all about control and precision.
Now, let's add angles. Draw some angled lines on your paper, and then practice cutting along them. Again, focus on keeping your cuts smooth and consistent. Vary the angles to create different effects. This is similar to cutting bangs or creating a V-shaped cut in hair. The more you practice, the more confident you'll become. For more inspiration on creative paper-cutting designs, explore our article on paper cutting designs.
Cut Type | Description | Hair Style Analogy |
|---|---|---|
Straight | Parallel to the paper, consistent pressure | Bob, blunt cut |
Curved | Following a curved line, smooth transitions | Layered haircut, rounded bangs |
Angled | Following an angled line, sharp transitions | V-cut, side-swept bangs |
Advanced Techniques: Layering and Texturizing
Advanced Techniques: Layering and Texturizing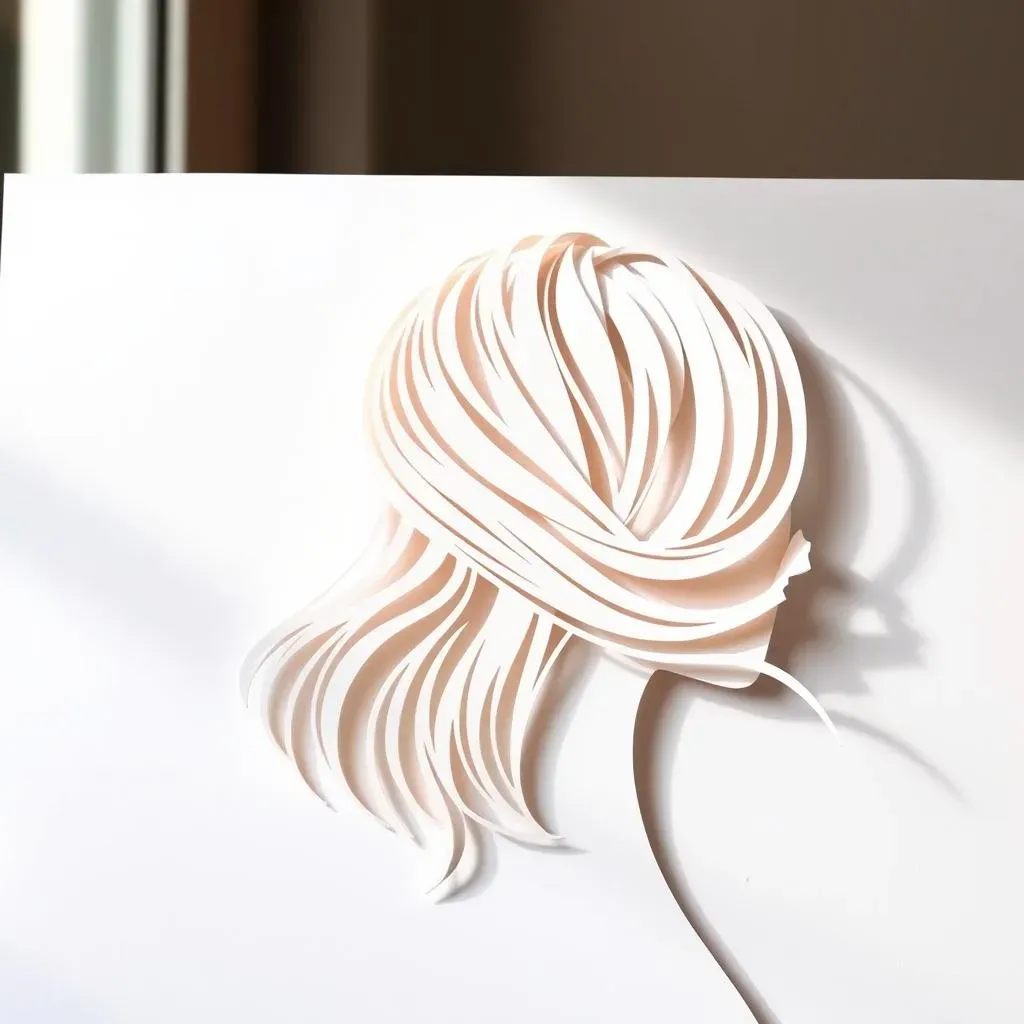
Creating Layers
Now let's move on to layering—a crucial technique for adding depth and dimension to your paper “hairstyles.” Start by drawing several horizontal lines on your paper, spaced unevenly. These represent the different layers of hair. Then, carefully cut along each line, varying the length of each layer to create a layered effect. Think of this as cutting long layers in hair; the longer layers create movement and volume, while shorter layers add texture and shape. Remember to keep your cuts smooth and consistent for a natural look. Don't be afraid to experiment with different lengths and spacing to see what you can achieve.
Experiment with different types of layering. Try creating long layers, short layers, or a combination of both. You can also try creating layers that are angled or curved. The possibilities are endless! Remember, practice makes perfect, and the more you experiment, the better you’ll become at creating realistic-looking layered hairstyles. For more inspiration on intricate paper cutting designs, you might find our guide on intricate paper cutting patterns helpful.
- Draw uneven horizontal lines to represent layers.
- Vary layer lengths for a dynamic look.
- Experiment with different layer types (long, short, angled, curved).
Adding Texture
Texturizing is another important technique for creating realistic-looking hairstyles. There are several ways to add texture to your paper cuts. One simple method is to use a different type of scissors, such as pinking shears, to create a jagged edge. This is ideal for simulating textured or choppy hairstyles. You can also use different cutting techniques to add texture. For example, try cutting small, uneven snips into the paper to create a wispy or feathered effect. This is similar to point cutting in hair, which adds texture and movement to the ends.
Another option is to use a tool like a comb to create sections in your paper before cutting. This helps you control the direction and density of the texture. Think of this as sectioning hair before cutting; it ensures you get even results and prevents accidental mistakes. Remember to experiment with different techniques to see what works best for you and the look you’re trying to achieve. For more advanced paper-cutting techniques, check out this ultimate guide on paper-cutting machines.
Texturizing Method | Description | Hair Style Analogy |
|---|---|---|
Pinking Shears | Creates a jagged edge | Choppy, textured bob |
Uneven Snips | Creates a wispy, feathered effect | Layered haircut with movement |
Comb Sectioning | Controls direction and density | Precise layers, graduated bob |
Blending Techniques
Finally, let's talk about blending. Blending is the art of seamlessly transitioning between different layers and textures to create a natural, cohesive look. This is where your precision and control really come into play. Start by practicing blending different types of cuts—straight, curved, and angled—together. Focus on creating smooth transitions between the different sections. Think of it as blending layers in a haircut; you want the layers to flow smoothly into each other, creating a natural, harmonious look. Avoid harsh lines or abrupt changes in texture.
Experiment with different blending techniques, such as point cutting, slide cutting, or feathering. These techniques help to soften harsh lines and create a more natural look. The more you practice, the better you’ll become at creating seamless transitions between different layers and textures. For a broader perspective on paper cutting techniques, you might want to check out our article on basic paper cutting techniques for more inspiration.
- Practice blending straight, curved, and angled cuts.
- Focus on creating smooth transitions.
- Experiment with point cutting, slide cutting, or feathering.
Beyond the Basics: Creating Realistic Hairstyles
Beyond the Basics: Creating Realistic Hairstyles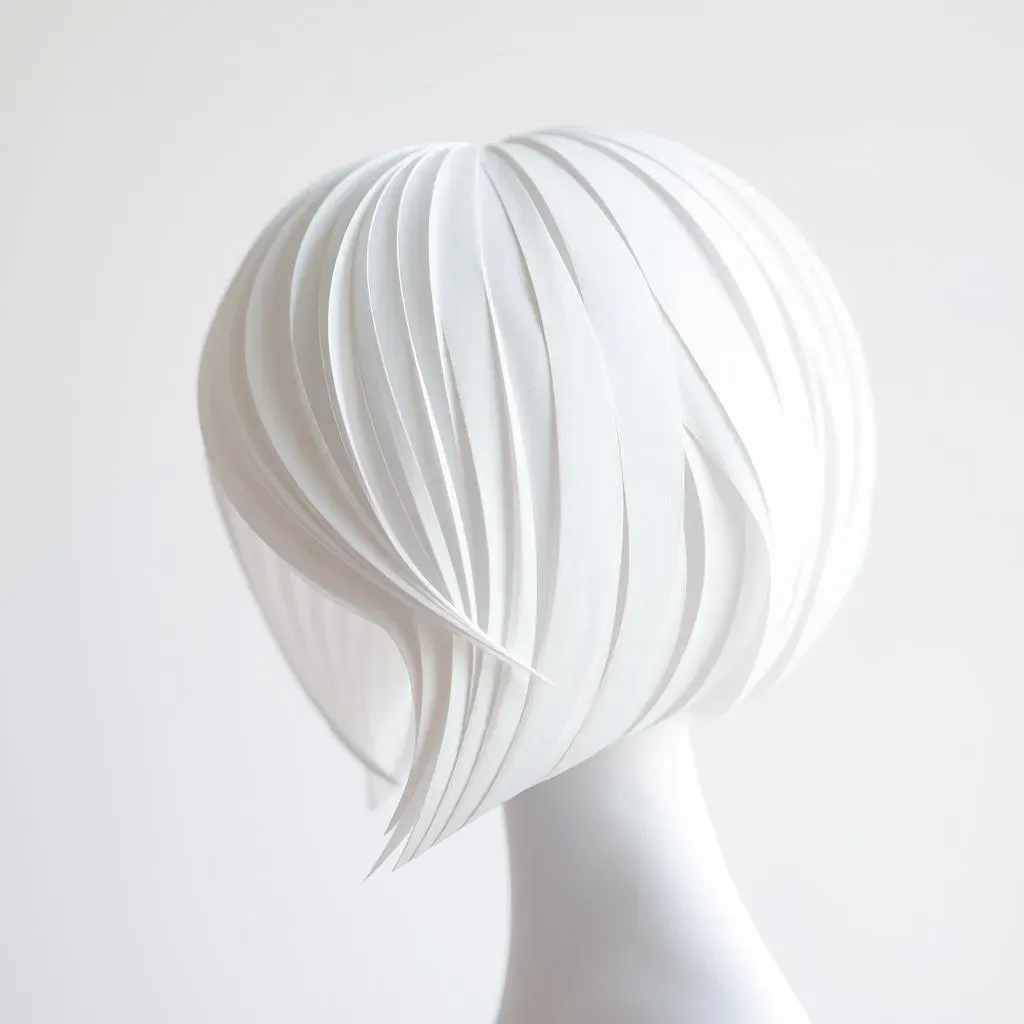
Adding Volume and Shape
Now that you've mastered basic cuts and layering, let's tackle volume and shape. Think about how you'd create a voluminous bob or a sleek ponytail. To add volume to your paper "hair," try cutting layers that are shorter at the crown and longer towards the ends. This creates a natural lift and fullness. You can also experiment with different cutting techniques, such as backcombing or teasing, to add more volume. Remember to keep the overall shape in mind as you work.
For creating specific shapes, consider using templates. Draw or print out outlines of different hairstyles, like a pixie cut or a layered lob, and use them as guides for your cuts. This helps you achieve precise shapes and proportions. Practice cutting around these shapes, paying close attention to detail. You'll be surprised how much this improves your ability to create realistic-looking hairstyles. Remember to experiment with different paper types to simulate different hair textures; thicker paper can create more defined shapes, while thinner paper allows for softer, more flowing styles. For more ideas on amazing paper cutting decorations, check out this article on paper cutting decorations.
- Create volume with shorter layers at the crown.
- Use templates for precise shapes and proportions.
- Experiment with different paper types for varied textures.
Creating Different Hair Textures
Let's explore different hair textures now. Think about how you'd cut curly hair versus straight hair. For curly hair, use a coarser paper and experiment with cutting rounded shapes and varying lengths. Avoid sharp, straight lines, as these won't reflect the natural movement of curls. Instead, focus on creating soft, rounded layers that mimic the way curls fall. Remember, curly hair has a different weight and flow than straight hair, and you can use the paper's texture to simulate this.
For straight hair, use a thinner paper and focus on creating precise, straight lines. Experiment with different types of layering to create different looks, such as a sleek bob or a layered lob. You can also use different cutting techniques to add texture, such as point cutting or slide cutting. Remember, precision is key when cutting straight hair, as even small imperfections can be noticeable. For more information on creating different paper-cutting designs, check out this guide on paper cutting designs.
Hair Texture | Paper Type | Cutting Technique |
|---|---|---|
Curly | Coarse paper | Rounded layers, varied lengths |
Straight | Thin paper | Precise lines, layering techniques |
Adding Details and Finishing Touches
Now for the fun part—adding details! Think about bangs, highlights, or even accessories. For bangs, try cutting a straight or angled fringe across the top of your paper "hair." For highlights, you can use colored paper or markers to add streaks of color. You can also add accessories, such as bows or headbands, to complete your look. These little details can make a big difference in the overall realism of your paper hairstyles. Remember, even small details can elevate your creations.
Don't be afraid to experiment and get creative! Try different combinations of cuts, layers, and textures to create unique hairstyles. Once you're happy with your creation, you can display your paper hairstyles on a wall or even photograph them. Sharing your work with others can be a great way to get feedback and inspiration. And remember, the key is to have fun and enjoy the process! For a comprehensive guide on dealing with paper cuts (just in case!), check out our article on dealing with paper cuts.
- Add bangs, highlights, or accessories.
- Experiment with different combinations.
- Share your work and get feedback.