Table of Contents
Have you ever been captivated by the intricate beauty of paper cutting? Those delicate designs, the surprising three-dimensionality, the sheer artistry – it's enough to make you want to pick up a blade and try it yourself. This comprehensive guide on how to do paper cutting craft will walk you through every step, from gathering the right tools and choosing your design to mastering essential techniques and proudly displaying your finished creations. Whether you're a complete beginner or looking to refine your skills, we'll equip you with the knowledge and confidence to transform simple paper into stunning works of art. We'll explore different design approaches, from simple shapes to more complex patterns, providing clear, step-by-step instructions for each cutting technique. You'll discover how to handle your tools safely, troubleshoot common problems, and learn expert tips for achieving professional results. But this isn't just about the process; we'll also show you how to showcase your paper-cutting masterpieces, whether it's through elegant framing or innovative display techniques. Get ready to embark on a creative journey, unlocking your potential and celebrating the joy of creating beautiful, unique paper art. Prepare to be amazed at what you can achieve with this accessible and rewarding craft!
Essential Tools and Materials for How to Do Paper Cutting Craft
Essential Tools and Materials for How to Do Paper Cutting Craft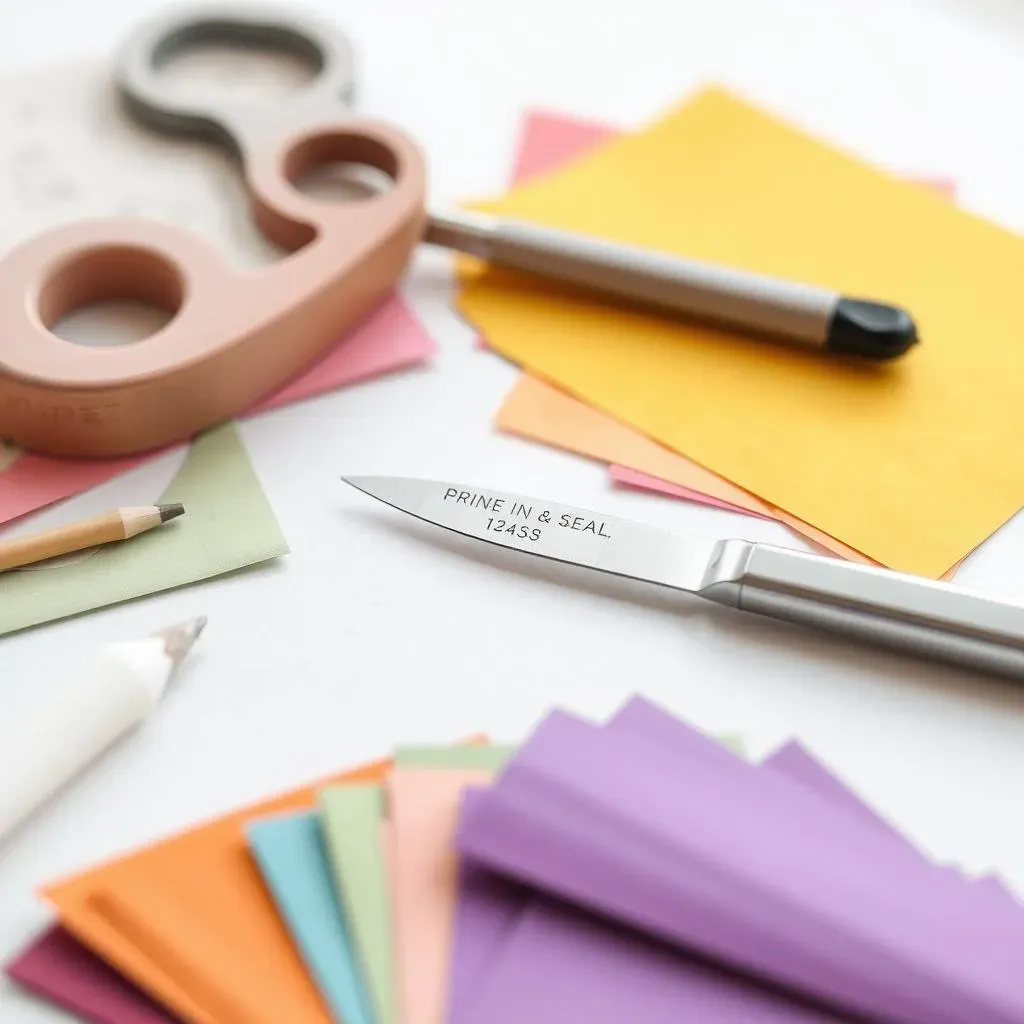
The Cutting Blade: Your Precision Instrument
First up, you'll need a sharp blade! A craft knife or scalpel is your best friend here. Look for one with interchangeable blades – trust me, you'll go through a few. A sharp blade makes all the difference in achieving clean, precise cuts. Dull blades lead to frustration (and potentially, paper tears!). When choosing a blade, consider the size and shape of the handle; comfort and control are key. There are many different types of blades available, so experiment to find what works best for you. Best scissors might also be helpful for some projects.
Remember safety first! Always use a self-healing cutting mat to protect your work surface and prevent accidental damage to your table or desk. These mats are designed to withstand repeated use, allowing you to focus on your craft without worrying about damaging your work area. Learning how to do paper cutting safely is crucial for a positive crafting experience.
Blade Type | Pros | Cons |
|---|---|---|
Scalpel | Precise, versatile | Requires careful handling |
Craft Knife | Good control, durable | Can be less precise than scalpels |
Paper Selection: The Foundation of Your Art
The type of paper you choose significantly impacts the final look and feel of your paper-cutting project. Thinner papers (around 80-120 gsm) are easier to cut, but they tear more easily. Thicker papers (160-200 gsm) are more durable and can handle intricate designs, but require more effort to cut. Consider the intricacy of your design when making your selection. Experiment with different types of paper – cardstock, specialty papers, even tissue paper – to see what you like best. For inspiration, check out these amazing paper cutting decorations.
Another important consideration is the color of your paper. Darker colors provide a striking contrast when cutting out designs, making the details pop. Lighter colors offer a more delicate aesthetic. Think about the overall look you're aiming for and choose accordingly. Don't forget that your choice of paper can even influence the types of paper cutting you can do.
- Cardstock (various weights)
- Specialty papers (e.g., watercolor paper)
- Tissue paper
Additional Supplies: Enhancing Your Paper Cutting Experience
While a sharp blade and good paper are essential, a few additional tools can significantly improve your paper-cutting experience. A metal ruler is invaluable for creating straight lines and precise cuts, especially helpful when working with geometric designs. A pencil is needed for sketching your design onto the paper, allowing for easy corrections before you begin cutting. Consider using tracing paper to transfer more complex designs onto your chosen paper.
Glue or adhesive is necessary for mounting your finished paper cut, especially if you are creating a layered or three-dimensional piece. Double-sided tape is a good option for smaller pieces, while a glue stick may be better suited for larger projects. Finally, don't forget the importance of proper lighting. Good lighting ensures you can see your work clearly and prevent accidental cuts. A well-lit workspace is crucial for precision and safety. For more in-depth information, check out our guide on essential paper cutting supplies.
Designing Your Paper Cut: From Simple Shapes to Intricate Designs
Designing Your Paper Cut: From Simple Shapes to Intricate Designs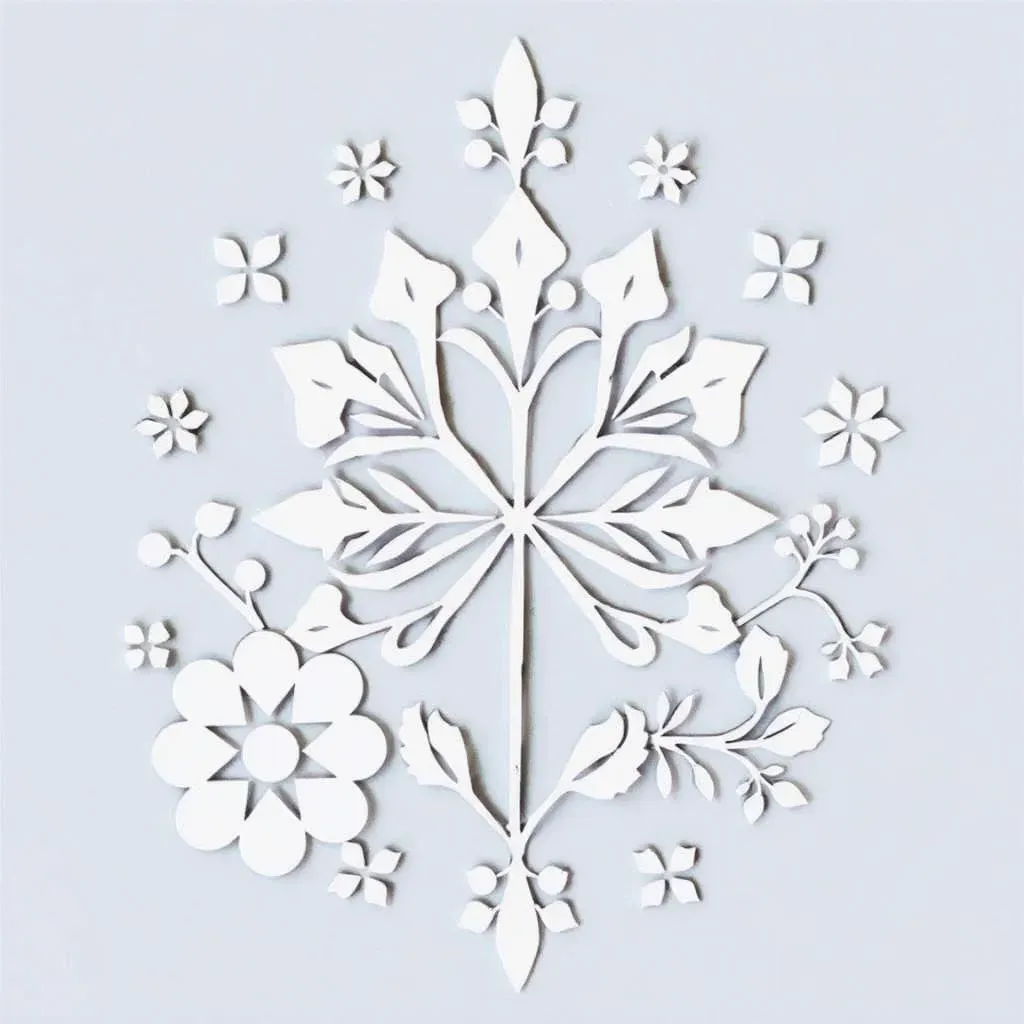
Starting Simple: Basic Shapes and Motifs
Begin your paper-cutting journey with simple shapes. Circles, squares, triangles – these are your building blocks. Practice making clean, precise cuts with your chosen blade and paper. Don't worry about creating masterpieces just yet; focus on developing your hand-eye coordination and getting comfortable with the tools. Once you've mastered basic shapes, try combining them to create more complex motifs. Think about overlapping circles to make flowers, or arranging squares to form geometric patterns. The possibilities are endless! For more inspiration on simple designs, check out these easy creative ideas.
Remember, even simple shapes can be incredibly effective when used creatively. Think about the negative space around your shapes – it's just as important as the shapes themselves. Experiment with different arrangements and see how the overall composition changes. A well-placed blank space can add as much visual interest as a meticulously cut shape. To improve your skills and get more ideas, consider taking a beginner paper cutting class.
- Circles
- Squares
- Triangles
- Stars
- Hearts
Adding Complexity: Intricate Patterns and Designs
Once you're comfortable with basic shapes, it's time to move on to more intricate designs. Start by incorporating more detail into your shapes – think about adding curves, lines, and textures. You can create patterns by repeating simple shapes, or by using a stencil to create a more complex design. Remember, precision is key when working with intricate designs; take your time and focus on making clean, accurate cuts.
Consider using tracing paper to transfer complex designs onto your chosen paper. This will help you to avoid making mistakes and ensure that your final piece is as accurate as possible. Experiment with different design styles – geometric, floral, abstract – to find what you enjoy most. Don't be afraid to experiment and try new things; that's how you'll develop your unique style. For some free templates to get you started, check out our selection of free paper cutting templates.
Design Type | Complexity | Tips |
|---|---|---|
Geometric | Medium to High | Use a ruler for straight lines |
Floral | Medium to High | Practice curved cuts |
Abstract | Low to High | Let your creativity flow! |
Inspiration and Resources: Finding Your Paper Cutting Style
Finding inspiration is key to developing your own unique paper-cutting style. Look at other artists' work, both online and in person. Visit museums and galleries, browse online portfolios, and explore different cultures' traditional paper-cutting styles. Let these influences spark your own creativity, but don't be afraid to experiment and develop your own unique approach. Remember, your style is what makes your work special.
There are tons of resources available online to help you learn more about paper cutting. Websites, blogs, and YouTube channels offer tutorials, tips, and inspiration. Don't be afraid to explore and find what works best for you. The more you learn and practice, the better you'll become. Remember to take your time and enjoy the process. Paper cutting is a relaxing and rewarding craft, so relax, have fun, and let your creativity flow! Check out these master paper cutting techniques to take your skills to the next level.
StepbyStep Guide: How to Do Paper Cutting Craft Techniques
StepbyStep Guide: How to Do Paper Cutting Craft Techniques
Preparing Your Design
First, you need a design! You can hand-draw one, trace a picture, or even use a digital design printed onto paper. Keep in mind the complexity; simple shapes are great for beginners. Remember to consider the paper's weight—thinner paper is easier to cut, but also more prone to tearing. If you’re struggling to come up with your own design, you can find plenty of inspiration online, or even use pre-made templates. Many websites offer free templates for various skill levels. For intricate designs, you might want to check out our guide on mastering intricate patterns.
Once you have your design, carefully transfer it to your chosen paper. Lightly sketch it with a pencil, ensuring the lines are clear enough to follow but light enough to erase easily. If you’re using a printed design, make sure the ink isn’t going to smudge or bleed when you cut. A good quality printer and heavy-duty paper will help prevent this. It’s also a good idea to practice on scrap paper first to get a feel for the paper and your cutting tools. This will help you to avoid mistakes on your final piece. Learning how to do paper cutting properly takes practice, so be patient with yourself!
- Hand-drawn designs
- Traced images
- Printed designs
- Pre-made templates
Cutting Your Design: Precision and Patience
Now for the fun part – the cutting! Secure your paper firmly on your cutting mat. Hold your cutting tool like a pencil, using a light touch and steady hand. Always cut away from yourself to avoid accidental cuts. Start with the larger sections of your design, working your way towards the smaller, more intricate details. Take your time – rushing can lead to mistakes and frustration.
For those fiddly bits, consider using smaller blades or even fine-tipped scissors. If you make a mistake, don’t panic! Small imperfections often go unnoticed, and you can always use a little glue or tape for minor repairs. Remember, the beauty of handmade paper cutting lies in its unique imperfections. For more advanced techniques and tips, check out our article on mastering paper cutting techniques.
Step | Action | Tip |
|---|---|---|
1 | Secure paper on mat | Use weights if needed |
2 | Cut larger sections first | Light pressure, steady hand |
3 | Work towards details | Use smaller tools if needed |
Displaying Your Paper Cutting Masterpieces: Framing and Beyond
Displaying Your Paper Cutting Masterpieces: Framing and Beyond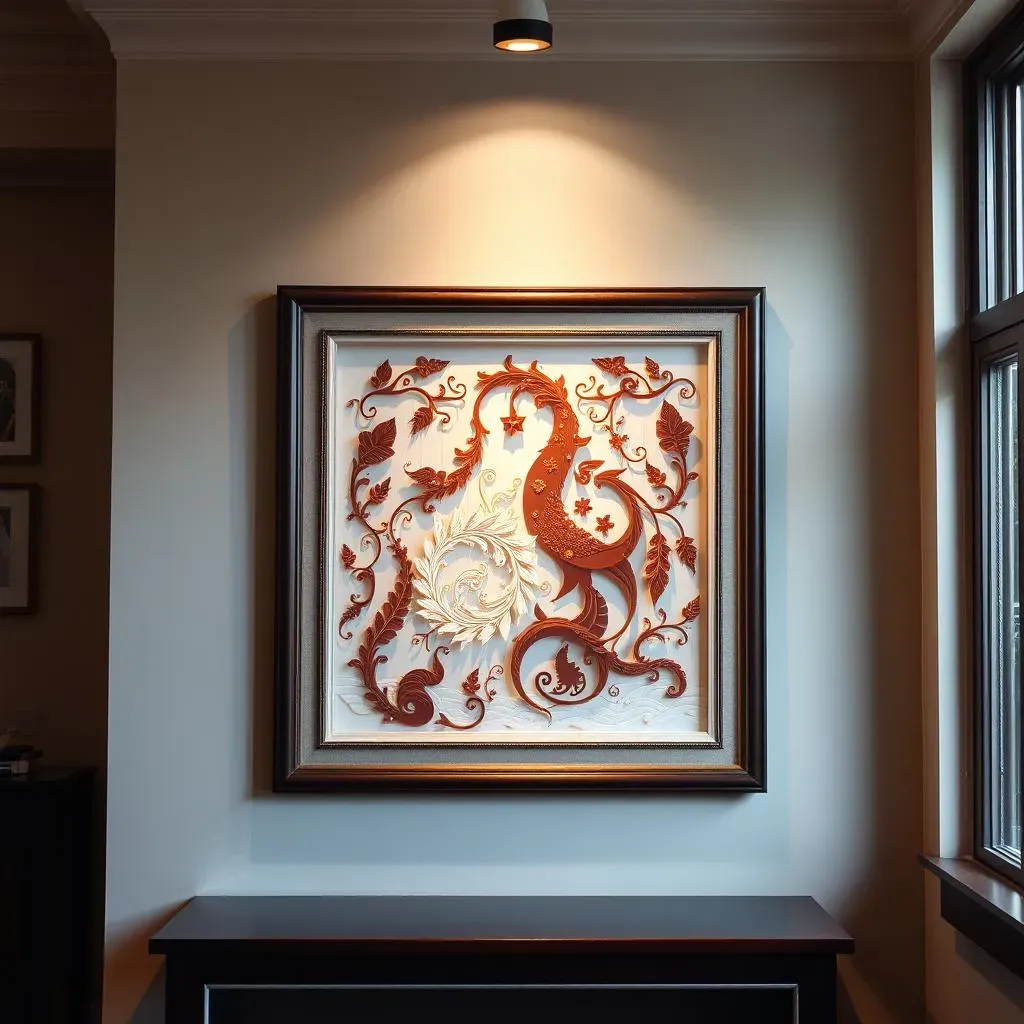
Framing Your Artwork
Framing is the classic way to showcase your paper-cutting masterpieces. A simple, elegant frame can elevate your artwork, protecting it from damage while allowing it to shine. Choose a frame that complements your design; a minimalist frame works well for intricate designs, while a more ornate frame might suit bolder, simpler pieces. Consider the color and material of the frame, ensuring it doesn't detract from the artwork itself. Matting your artwork can add another layer of sophistication, providing a subtle background that enhances the contrast and color of your paper cut. For more ideas on framing, check out our article on amazing paper cutting decorations.
When framing, ensure your paper cut is centered and securely fastened to prevent movement or damage. Using acid-free materials is crucial for preserving your artwork over time; acid can damage paper, causing discoloration and brittleness. Consider using UV-protective glass to further protect your artwork from fading due to sunlight exposure. Proper framing not only preserves your work but also elevates its presentation, turning a simple craft into a cherished piece of art. Learn more about crafting stunning greeting cards using your papercuts.
- Choose a frame that complements your design.
- Use acid-free materials for preservation.
- Consider UV-protective glass.
- Securely fasten your artwork.
Beyond the Frame: Creative Display Options
While framing is a popular choice, there are many other creative ways to display your paper-cutting artwork. Consider using shadow boxes to create depth and dimension. This is especially effective for layered or three-dimensional pieces, allowing you to showcase the intricate details and shadows. Shadow boxes add a touch of elegance and sophistication, transforming your paper cuts into miniature works of art. For unique display ideas, read our article on easy creative ideas.
Alternatively, you can incorporate your paper cuts into other craft projects. Use them to decorate greeting cards, gift wrap, or even scrapbook pages. This is a great way to add a unique, personal touch to your projects. You can also use your paper cuts to create wall hangings, mobiles, or even jewelry. The possibilities are endless! Don't forget to consider the overall aesthetic of your display; ensure the setting complements your paper-cutting style and the message you wish to convey. If you're looking for more ideas, check out our guide on mastering paper cutting stencils.
Display Method | Pros | Cons |
|---|---|---|
Framing | Classic, elegant, protective | Can be expensive |
Shadow Box | Adds depth and dimension | Requires specific box |
Incorporation into other crafts | Versatile, personalized | Requires additional materials |