Table of Contents
Have you ever been captivated by the delicate beauty of Chinese paper cutting, also known as jianzhi? These intricate designs, often depicting animals, flowers, or auspicious symbols, are a testament to centuries of artistic tradition. This article is your passport to unlocking this ancient art form. We'll take you on a journey, from gathering the essential tools and mastering basic techniques to creating your own stunning masterpieces. Learning how to do Chinese paper cutting isn't about simply cutting paper; it's about connecting with a rich cultural heritage and expressing your creativity. We'll cover everything you need to know, step-by-step, from simple folds and cuts to more advanced techniques that will allow you to create intricate and breathtaking designs. Get ready to explore the fascinating world of jianzhi and discover the joy of bringing these beautiful paper artworks to life. Whether you're a complete beginner or have some experience with paper crafts, this comprehensive guide will equip you with the knowledge and inspiration to start your own paper-cutting adventure. Prepare to be amazed by what you can create!
Essential Tools and Materials for Chinese Paper Cutting
Choosing the Right Paper
The type of paper you choose significantly impacts the final look of your paper cutting. Thinner papers, like tissue paper or even some printer paper, are easier to cut intricate details but might tear easily. For bolder designs, a heavier weight paper, such as cardstock, provides more stability. Experiment to find your preference! Consider the paper's texture, too; a smooth surface allows for cleaner lines, while a slightly textured paper can add visual interest. For a deeper dive into paper selection, check out our guide on choosing the right paper.
Don't be afraid to experiment with different colors and patterns! Colored paper can add a vibrant pop to your designs, and patterned paper can introduce interesting textures and visual elements. You can even try using metallic or textured papers for unique effects. Remember, the possibilities are endless!
Paper Type | Pros | Cons |
|---|---|---|
Tissue Paper | Easy to cut intricate details | Tears easily |
Printer Paper | Readily available | Can be difficult to cut fine details |
Cardstock | Durable, holds details well | Can be more challenging to cut |
Essential Cutting Tools: Scissors and Blades
Sharp scissors are your best friend when it comes to paper cutting. Small, sharp-pointed scissors are ideal for detailed work, allowing for precise cuts and curves. Larger scissors can be useful for cutting out larger sections of your design. If you're feeling adventurous, you can also try using X-ACTO knives or craft blades for incredibly fine details and crisp lines. However, these require more experience and caution due to the sharpness of the blades. Remember safety first! Always use a cutting mat to protect your work surface. For more guidance, check out our article on best scissors for paper cutting.
Think of your cutting tools as extensions of your artistic vision. A good pair of scissors will glide through the paper, making the process smoother and more enjoyable. A dull pair, on the other hand, can lead to frustrating, uneven cuts and potentially ruin your artwork. Invest in quality tools, and your creations will thank you for it!
- Small, sharp-pointed scissors
- Larger scissors for bulkier cuts
- X-ACTO knife or craft blade (for advanced users)
- Self-healing cutting mat
Additional Supplies: Pencil, Ruler, and Templates
A simple pencil is crucial for sketching your design onto the paper before cutting. A ruler helps ensure straight lines and precise measurements, particularly important for geometric patterns or symmetrical designs. Using templates, whether you create your own or use pre-made ones, is a fantastic way to practice and create consistent designs. You can find free templates online or at craft stores. For more inspiration, check out our article on paper cutting templates.
While these might seem like simple tools, they are essential for creating clean, accurate cuts. A well-defined sketch will make the cutting process much easier and reduce the chances of mistakes. And don't underestimate the power of a good template—it can be a lifesaver for intricate designs.
Basic Techniques: Folding, Cutting, and Creating Simple Designs
Folding Your Paper: The Foundation of Jianzhi
Let's start with the basics! Folding your paper is the first step in creating many jianzhi designs. Simple folds create symmetry and allow you to cut multiple shapes at once, saving you time and effort. Begin by folding your square paper in half, then in half again. You'll now have a smaller square with multiple layers. More complex designs might involve additional folds, creating more intricate shapes. Experiment with different folding techniques; you can fold your paper into triangles, rectangles, or even more complex shapes. Remember, practice makes perfect!
Think of the folds as a blueprint for your design. Each fold creates a mirror image, so whatever you cut on one side will automatically appear on the other. This is particularly helpful for symmetrical designs, like flowers or butterflies. For more advanced folding techniques, check out our guide to mastering paper cutting techniques. It's amazing how a simple fold can transform a piece of paper into a work of art!
Fold Type | Description | Result |
|---|---|---|
Half Fold | Fold the paper in half | Two equal rectangles |
Quarter Fold | Fold in half, then in half again | Four equal squares |
Triangle Fold | Fold a corner to the opposite side | A triangle shape |
Making Your First Cuts: Simple Shapes and Patterns
Once your paper is folded, it's time to get creative! Start with simple shapes—circles, squares, triangles, or even simple flowers. Trace your design lightly with a pencil, making sure to stay within the folded lines. Then, carefully cut along your pencil lines. Remember to cut slowly and precisely, especially when working with intricate details. Don't rush it; patience is key to creating clean, crisp cuts. Once you've finished cutting, carefully unfold your paper to reveal your design. It's always exciting to see your creation come to life!
Don't be afraid to experiment! Try cutting different shapes and patterns. You can create simple geometric designs or experiment with organic shapes like leaves or petals. You can even combine different shapes to create more complex designs. The possibilities are endless, and the more you practice, the more confident you'll become. For some inspiring ideas, browse our collection of easy paper cutting projects.
- Start with simple shapes: circles, squares, triangles
- Trace your design lightly with a pencil
- Cut slowly and precisely
- Unfold carefully to reveal your design
Adding Detail and Refinement: From Simple to Stunning
Once you've mastered the basics, you can start adding more detail to your designs. Try incorporating small details like dots, lines, or curves. You can create texture by cutting small, repetitive shapes. Adding these details can transform a simple shape into something truly unique and captivating. Remember, even small details can make a big difference in the overall look of your artwork. Don't be afraid to experiment with different techniques to find what works best for you.
Consider adding negative space to your designs. Negative space is the area around your shapes, and it can be just as important as the shapes themselves. By carefully considering the negative space, you can create a more balanced and visually appealing design. For example, you might cut out the shape of a bird, leaving the surrounding paper as the background. This creates a striking visual effect. For more advanced techniques, explore our guide on intricate paper cutting designs. It’s all about finding the balance between positive and negative space to create a visually pleasing composition.
How to Do Chinese Paper Cutting: Advanced Techniques for Intricate Designs
How to Do Chinese Paper Cutting: Advanced Techniques for Intricate Designs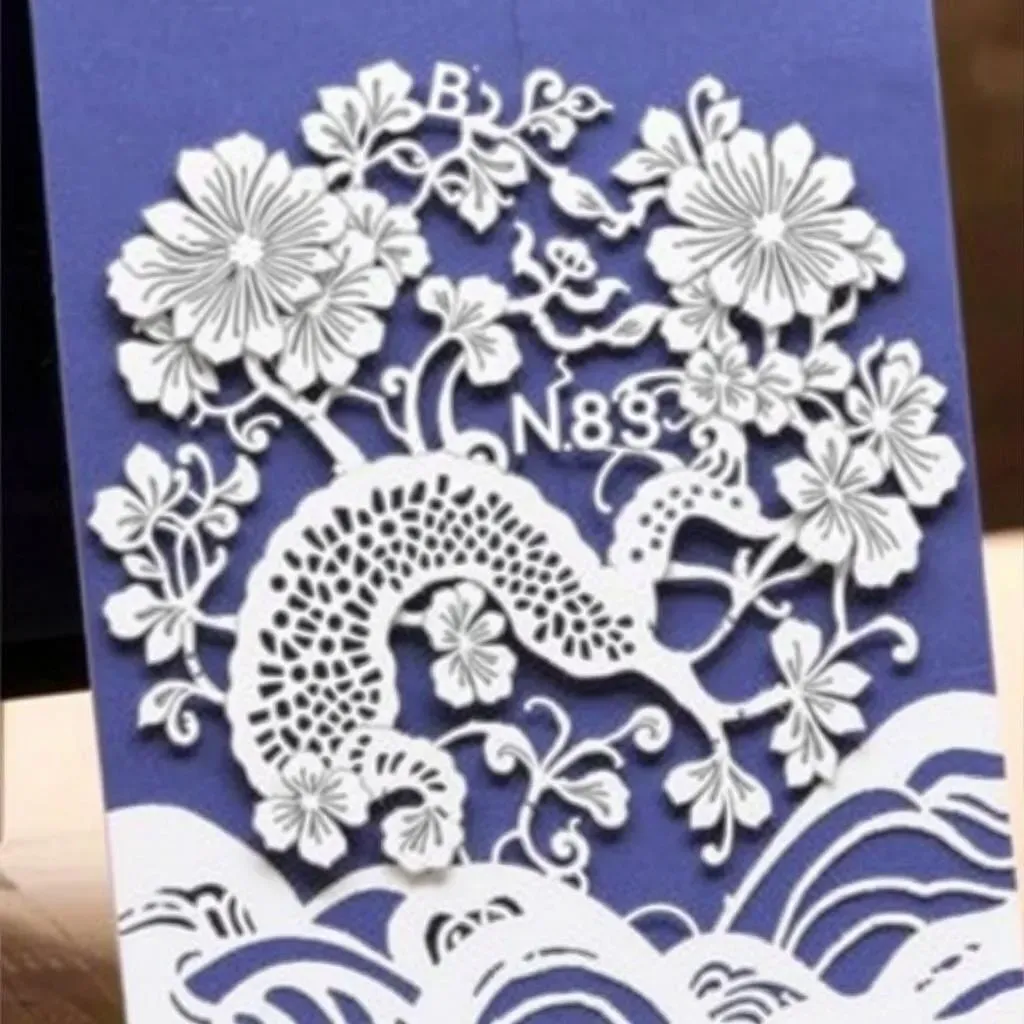
Mastering Intricate Cuts: Layering and Detail
Now that you've mastered basic shapes and simple designs, let's explore the exciting world of layering and intricate details. Layering involves cutting multiple pieces of paper and arranging them to create a three-dimensional effect or add depth to your design. It's like building a paper sculpture! Start with a simple design, and then add layers of smaller, more detailed cuts on top. Experiment with different colors and textures to create a visually stunning piece. For instance, you could create a layered flower, with each layer having a slightly different color or pattern. This technique adds depth and visual interest to your designs. Remember, patience is key; take your time and focus on precision. For more inspiration on creating layered designs, check out our article on intricate paper cutting designs.
Think of it as building a tiny paper world. Each layer tells a part of the story, adding complexity and depth to your artwork. You can layer different shapes, textures, and colors to create amazing visual effects. Don't be afraid to experiment and see what you can create. The possibilities are endless!
Layer | Description | Effect |
|---|---|---|
Base Layer | Largest shape, often a simple form | Provides foundation for the design |
Second Layer | Adds details and complexity | Increases visual interest |
Third Layer (and beyond) | Adds finer details, texture, and depth | Creates a three-dimensional effect |
Exploring Advanced Techniques: Symmetry and Negative Space
Let's delve into the art of symmetry and negative space. Symmetrical designs are visually appealing and often found in traditional jianzhi. To create symmetry, fold your paper carefully, ensuring the fold is perfectly aligned. Then, draw half of your design on one side of the fold, ensuring it aligns with the fold line. When you cut, you’ll create a perfectly mirrored image on the other side. This technique is fantastic for creating intricate floral patterns, butterflies, or other designs that benefit from mirror-image symmetry.
Negative space is often overlooked but can be a powerful tool for creating striking designs. Instead of focusing solely on the shapes you cut out, consider the shapes that remain. These negative spaces can create unexpected visual effects and add depth to your design. For example, a simple design of a bird could be enhanced by cleverly using the negative space to suggest wings or a tail. For advanced techniques in using negative space, take a look at our guide on exploring intricate designs. Mastering negative space is a game-changer in paper cutting.
- Symmetrical designs: Fold paper, draw half the design, and cut.
- Negative space: Consider the shapes that remain, not just the cut-outs.
- Experiment with different combinations of positive and negative space.
How to Do Chinese Paper Cutting: Inspiration and Design Ideas for Your Projects
How to Do Chinese Paper Cutting: Inspiration and Design Ideas for Your Projects
Finding Your Inspiration: Nature, Culture, and Personal Style
Let's talk inspiration! Where do you even begin when it comes to designing your own paper cuts? The world is your oyster! Nature is a fantastic starting point. Think delicate flowers, graceful birds, or majestic animals. You could even try replicating intricate leaf patterns or the swirling shapes of clouds. Alternatively, delve into Chinese culture for inspiration. Traditional symbols, like the auspicious Fu character or the beautiful peony flower, make stunning paper cut designs. You can find many examples online or in books on Chinese art. For more ideas on Chinese symbols, check out our article on amazing paper cutting decorations.
But don't limit yourself to these suggestions! Let your personal style shine through. Perhaps you're drawn to geometric patterns, abstract shapes, or even whimsical creatures. The beauty of paper cutting is its versatility. You can create anything you can imagine. Don't be afraid to experiment and develop your own unique style. You could even combine elements from different sources to create something entirely new and original. For example, you could take a traditional Chinese symbol and combine it with a modern geometric pattern to create something fresh and exciting. Check out our guide on designing paper cuts for more ideas.
Inspiration Source | Examples | Style |
|---|---|---|
Nature | Flowers, leaves, animals, clouds | Organic, flowing lines |
Chinese Culture | Fu character, peony, dragons, phoenixes | Traditional, symbolic |
Personal Style | Geometric patterns, abstract shapes, whimsical creatures | Unique, expressive |
Designing Your Paper Cut: From Sketch to Snip
Once you've found your inspiration, it's time to bring your vision to life! Start by sketching your design on paper. Don't worry about making it perfect at this stage; just get your ideas down. You can use a pencil to lightly sketch your design. Then, if you are happy with your sketch, use a pen to trace over it for a clearer design. Remember, this is your design, so let your creativity flow! Consider the overall composition of your design. How will you arrange the shapes and lines to create a balanced and visually appealing piece?
Consider the use of negative space in your design. Negative space is the area around your shapes, and it can be just as important as the shapes themselves. By carefully considering the negative space, you can create a more balanced and visually appealing design. Experiment with different arrangements of shapes to see how the negative space changes the overall effect. Using a ruler can be helpful for creating straight lines and symmetrical patterns, especially for geometric or traditional designs. For more tips on sketching and design, check out our article on how to design paper cuts.
- Sketch your design lightly with a pencil.
- Consider the composition: balance, visual appeal.
- Experiment with negative space.
- Use a ruler for straight lines and symmetry.
Putting It All Together: From Design to Finished Artwork
Now that you have a design you love, it's time to translate it onto your chosen paper. Carefully transfer your sketch onto the folded paper, using a pencil or pen. Remember to be precise, especially with intricate details. Once you have your design transferred, carefully cut along the lines. Take your time and use sharp scissors or a blade. Remember, patience is key! Once you've completed cutting, carefully unfold your paper to reveal your finished artwork. It's always a magical moment to see your design come to life!
Consider adding details to your finished artwork. You could add color using markers, paints, or colored pencils. Or perhaps you want to frame your artwork to show it off. Experiment with different framing options to see what works best for your design. You can also use your paper cuts to create decorations. For example, you could use them to create cards, gift tags, or wall hangings. For more ideas on how to display and use your paper cuts, check out our article on paper cutting frames and ideas.