Table of Contents
Ever looked at intricate paper art and wondered how those super clean, crisp lines are made? It's not magic, it's all about mastering the art of paper cutting lines! This guide will take you from newbie to nimble-fingered paper artist. We'll start with the essential tools you'll need, like a good cutting mat and a sharp blade – trust me, a dull one is your worst enemy. Then, we'll get into the nitty-gritty of basic techniques, think straight cuts, curves, and how to turn the paper instead of wrestling with your blade. Feeling adventurous? We'll tackle more complex designs, including tips for keeping your sanity when things get fiddly. And because everyone messes up sometimes, we've got a section on troubleshooting common issues, like those annoying snags and tears. By the end of this, you'll not only understand how to create precise paper cutting lines but also be ready to make some seriously cool art.
Essential Tools for Precise Paper Cutting Lines
Essential Tools for Precise Paper Cutting Lines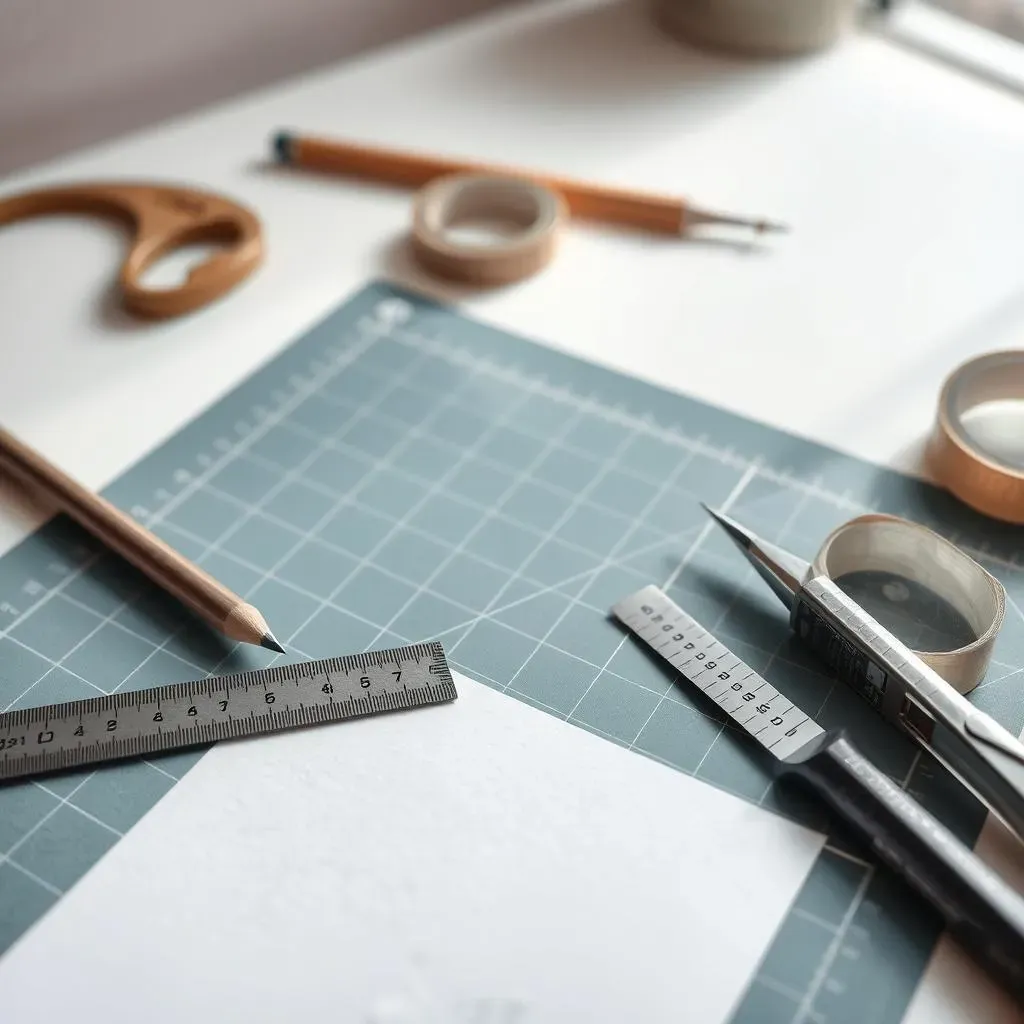
The Cutting Surface: Your Foundation
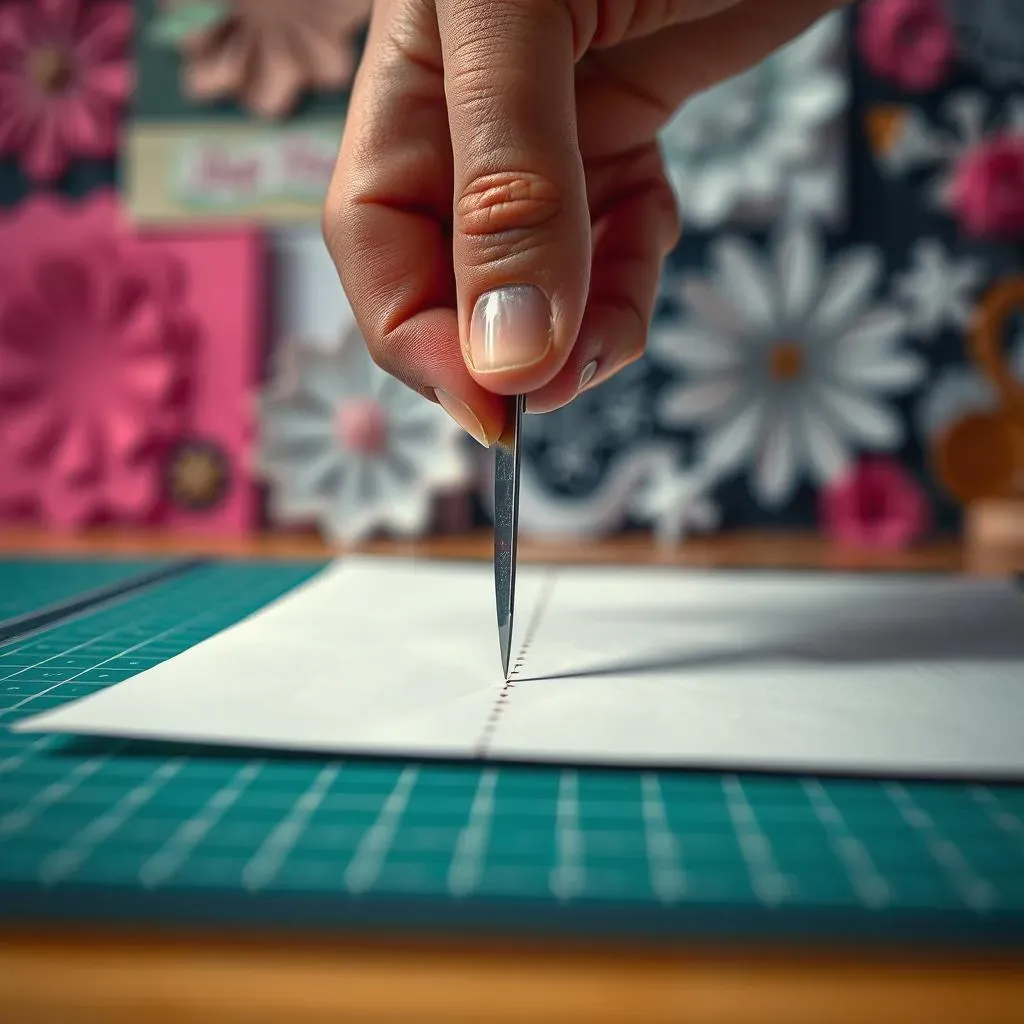
First things first, you need a good cutting mat. It's not just some fancy accessory; it's your workbench. Think of it like a chef's cutting board. You wouldn't chop veggies on your kitchen counter, would you? The mat protects your table, but more importantly, it gives your blade something to bite into without getting stuck. A self-healing mat is the way to go. It has layers that close up after you cut, so you're not just making a mess of grooves. I learned this the hard way, slicing directly on a desk, which now bears the scars of my early paper cutting adventures. Now, I use a self-healing mat, and it's a game-changer, plus it keeps my desk safe from rogue blades.
The Blade: Sharpness is Key
Next up, the blade. Forget those clunky craft knives with the dull edges. You need a scalpel or a precision knife with a really sharp point. It's like the difference between a butter knife and a surgeon's blade. Seriously, the sharper, the better. Dull blades tear and snag paper, and that means fuzzy, uneven lines. You want clean cuts, right? Replace your blades often, especially if you're cutting a lot. I keep a little container of used blades because, trust me, you'll go through them faster than you think. It might seem wasteful, but it’s worth it for the crispness it brings to your paper cutting lines. And please, be careful with those things; they're sharp!
Tool | Why You Need It | My Recommendation |
|---|---|---|
Self-Healing Cutting Mat | Protects surfaces, provides a stable cutting base | A3 or larger, depending on your typical project size |
Precision Scalpel/Knife | Ensures clean, accurate cuts | Replaceable blades, ergonomic handle |
Metal Ruler | For straight cuts, acts as a guide | Steel ruler with non-slip backing |
The Extras: Don't Forget These!
Finally, you'll need a few extras. A good metal ruler is essential for straight cuts. Plastic ones slip, and you don't want that. Also, a pair of tweezers is a lifesaver for picking up small bits of paper. And, a roll of masking tape to keep your paper from shifting. It is helpful to have a pencil for marking your design on the paper, but remember to make your pencil line light, so it does not show after you finish your project. And don't forget a good light! You'll be staring at tiny details, so make sure you can see them. These might seem like minor things, but they can really affect the quality of your paper cutting lines. I once tried to work in a dimly lit room, and let’s just say, the results were not pretty. So, good lighting and the right tools are essential to your art.
Mastering Basic Paper Cutting Lines Techniques
Mastering Basic Paper Cutting Lines Techniques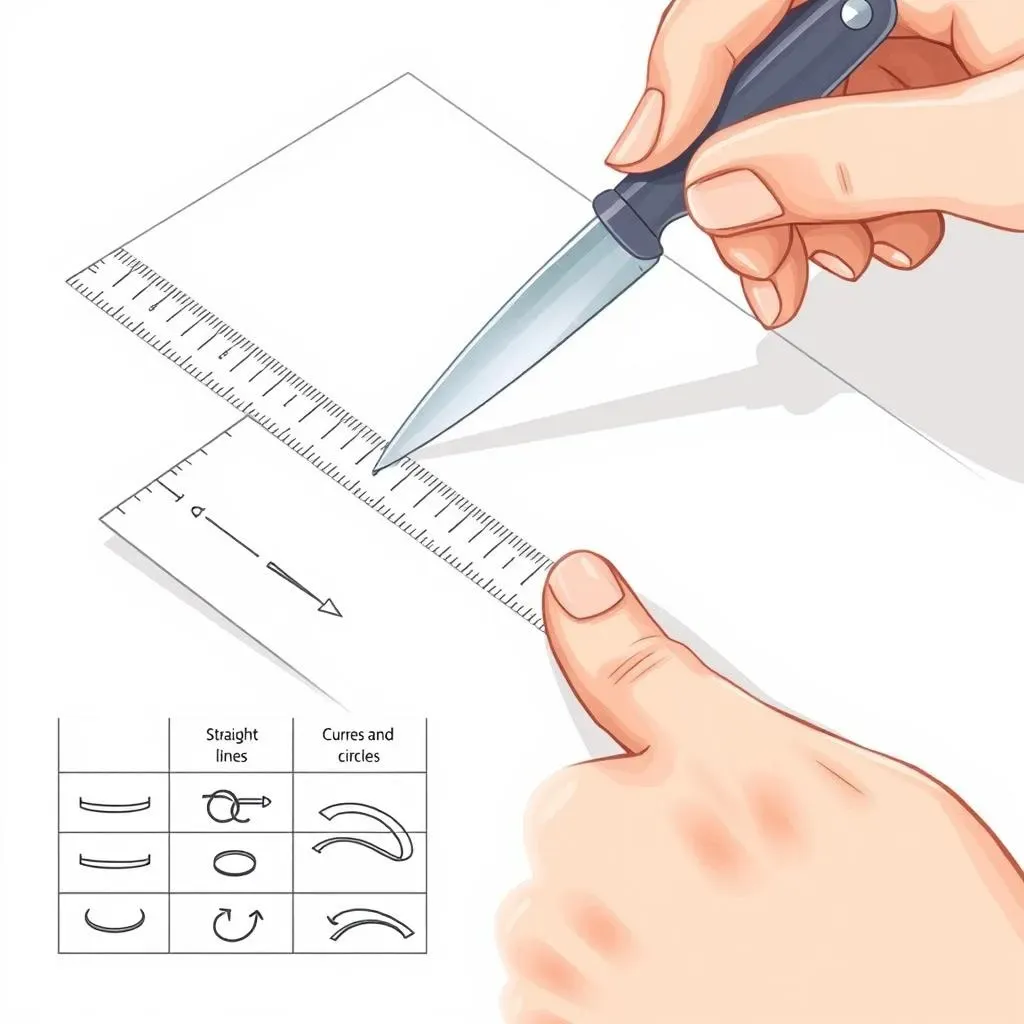
Straight Cuts: The Foundation
Okay, so you've got your tools, now let's get cutting! Straight lines are the bread and butter of paper cutting. They seem simple, but they're the base for everything else. The trick is to use your metal ruler as a guide. Place it firmly on your paper, and then run your blade along the edge. Don't try to cut through the paper in one go. Instead, use light, even pressure and make several passes. Think of it like gently scratching the surface. It's much easier to control and it will give you a cleaner line. I used to try and hack through the paper in one go and ended up with jagged, messy edges, so trust me on this one. Slow and steady wins the race with paper cutting lines.
Curves and Circles: Smooth Moves
Now for the fun part, curves and circles. These are a little trickier than straight lines, but with the right technique, you'll get the hang of it. The secret here is to move the paper, not your blade. Keep your blade in a relatively fixed position and rotate the paper as you cut. This will help you navigate the curves smoothly. It's like drawing a circle on paper, you turn the paper instead of your pencil. If you try to force your blade to follow a curve, you'll end up with sharp corners and uneven lines. I remember trying to cut a perfect circle freehand and it ended up looking like a lumpy potato, so, take it from me, moving the paper is the way to go. It's all about control and being gentle with the paper.
Technique | Description | Key Tip |
|---|---|---|
Straight Cuts | Using a ruler as a guide, make multiple light passes with the blade. | Don't try to cut through in one go. |
Curves and Circles | Move the paper instead of the blade. | Keep the blade in a fixed position and rotate the paper. |
Turning Corners: Sharp and Precise
Turning corners is another essential skill. The key is to stop before you get to the corner, lift your blade, reposition the paper, and then continue cutting in the new direction. Don't try to pivot your blade while it's still in the paper; that's a recipe for disaster. You'll get a tear or a messy corner. It's all about making clean breaks. I used to rush corners, thinking I could just swing my blade around, and it looked awful. So, take your time, lift your blade, and make those corners sharp. Precision is what makes paper cutting so satisfying, and corners are a big part of that.
Advanced Paper Cutting Lines and Intricate Designs
Advanced Paper Cutting Lines and Intricate Designs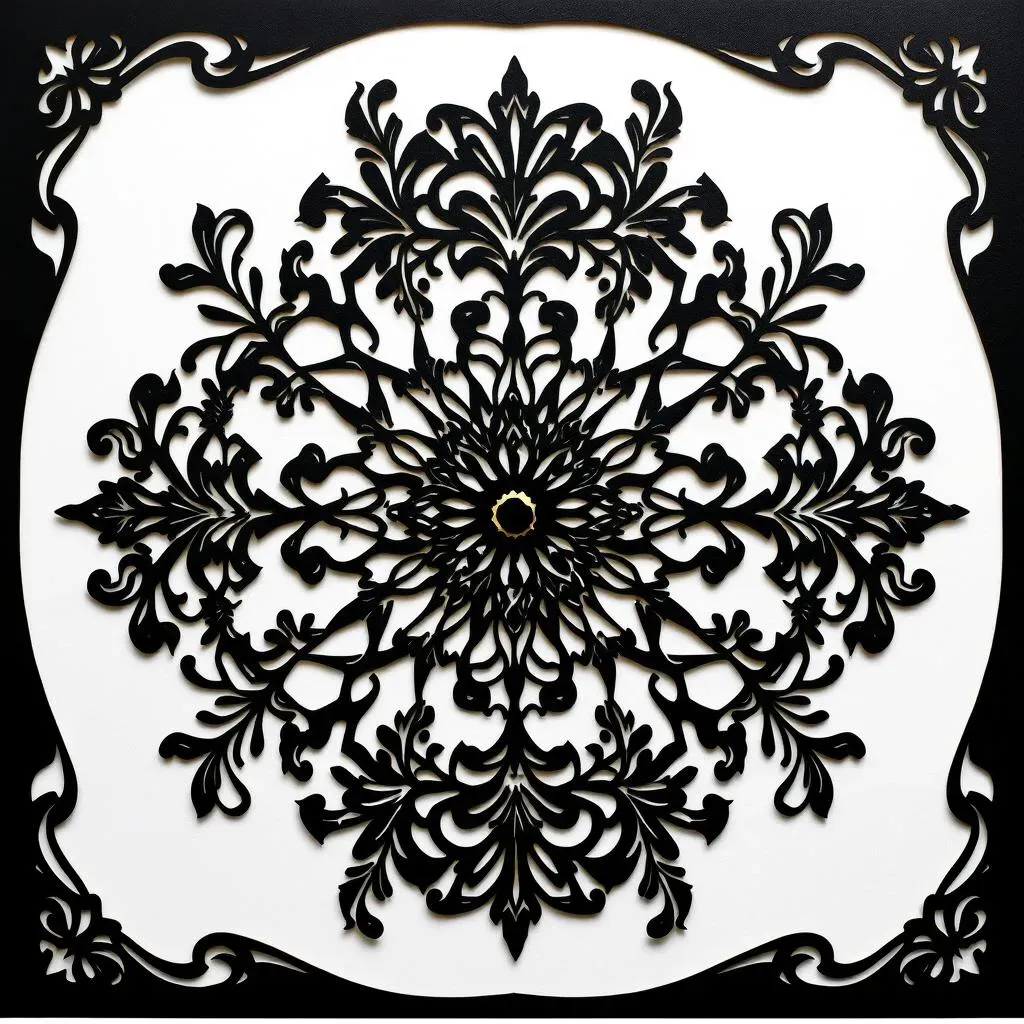
Layering and Depth: Adding Dimension
Ready to kick things up a notch? Let's talk about layering. This is where paper cutting really starts to shine. Instead of just cutting out a single design, you can create multiple layers, each with its own cutouts. Think of it like a 3D puzzle. You cut out a base layer, then add another layer on top, and another, and another. The key here is to plan ahead. You need to know how each layer will interact with the others. I like to sketch out my designs beforehand, marking which parts will be on top and which will be underneath. It's like building a tiny paper city, and each layer adds more depth and complexity. This technique makes your paper cuts really pop, giving them a whole new dimension.
Intricate Patterns: Patience is Key
Now, let's get into the really fiddly stuff: intricate patterns. This is where your patience gets tested. Think tiny, delicate details, like lace or complex geometric shapes. The key here is to take your time. Don't rush it. Use a super sharp blade and make sure you have good lighting. I find it helpful to work in small sections, focusing on one area at a time. Trying to do too much at once is a recipe for disaster. It's like doing a massive jigsaw puzzle; you don't try to do it all at once. You focus on small sections, and eventually it all comes together. And remember, if you need a break, take one. A fresh pair of eyes can make all the difference.
Technique | Description | My Tip |
|---|---|---|
Layering | Cutting multiple layers of paper to create depth. | Plan your design beforehand, marking which parts go on top. |
Intricate Patterns | Cutting complex, delicate designs. | Work in small sections, take breaks, and use a very sharp blade. |
Negative Space: What You Don't Cut
Finally, let's talk about negative space. This is the area around your cutouts. The space you leave is just as important as the space you cut. It's like the background in a painting. It helps define the shapes and creates contrast. When designing your paper cut, think about how the negative space will look. Will it create interesting shapes? Will it enhance your design? It's not just about what you cut out; it's also about what you leave behind. I often find that the negative space adds a whole new element to my paper cuts. Sometimes, it's even more interesting than the cutouts themselves. So, pay attention to the space around your design, and you'll be amazed at how it can enhance your work.
Troubleshooting Common Paper Cutting Lines Issues
Troubleshooting Common Paper Cutting Lines Issues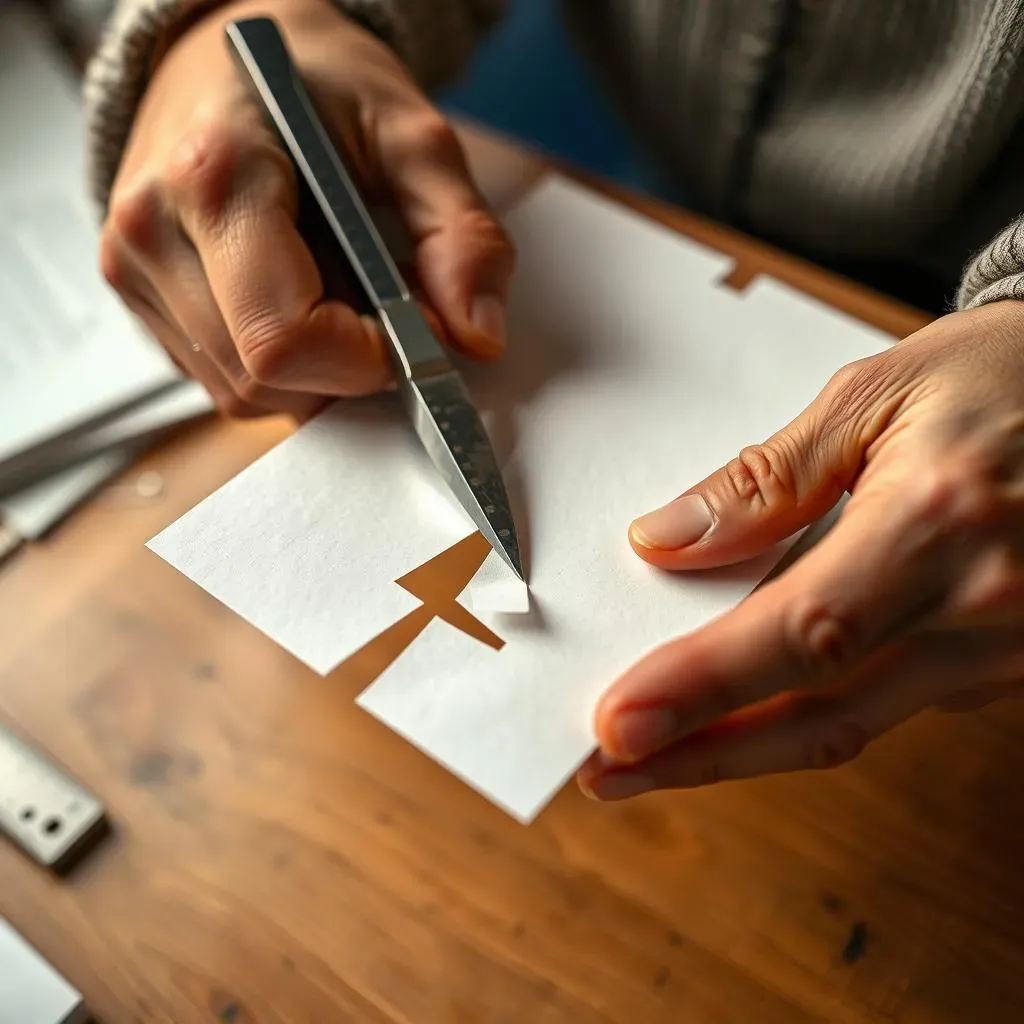
Tears and Snags: When Things Go Wrong
Okay, let's be real, paper cutting isn't always smooth sailing. You're gonna get tears, snags, and those frustrating moments where the paper just doesn't want to cooperate. It happens to everyone, even me, and I've been doing this for ages. The most common cause? A dull blade. If your blade isn't sharp, it's going to pull and tear the paper instead of cutting it cleanly. Another culprit is using too much pressure. You don’t need to force the blade through, light pressure and multiple passes are the key. And sometimes, it's just the paper itself. Some papers are more prone to tearing, especially if they're too thin or have a rough texture. So, if you're getting a lot of tears, try switching to a different type of paper and make sure your blade is sharp. It’s like trying to cut a tomato with a spoon, it’s just not going to go well.
Fuzzy Edges: Achieving Clean Cuts
Fuzzy edges are another common frustration. Those little wisps of paper that stick out from your cut lines? Annoying, right? This usually means your blade isn't cutting cleanly. Again, it could be a dull blade, so try swapping it out for a fresh one. It could also be that you are not making enough passes. Sometimes, one cut is not enough, and you need to go over the same line again. Also, ensure you are using a firm, steady hand. If you're wiggling or shaking, your edges will be uneven. Think of it like drawing a line; the steadier your hand, the smoother the line. And remember, slow and steady wins the race. Don’t rush your cuts; focus on each section individually.
Issue | Possible Cause | Solution |
|---|---|---|
Tears and Snags | Dull blade, too much pressure, paper type | Replace blade, use light pressure, try different paper |
Fuzzy Edges | Dull blade, not enough passes, unsteady hand | Replace blade, make multiple passes, steady your hand |
Uneven Lines | Moving the blade instead of the paper, not using a ruler for straight lines | Move the paper, use a metal ruler |
Uneven Lines: Keeping it Straight
Uneven lines are the bane of any paper cutter's existence. You start with a nice, straight line and then suddenly, it goes all wobbly. This often happens when you move your blade instead of the paper, especially when doing curves and circles. It also happens when you're not using a ruler for straight lines. The ruler is your friend, it helps you get nice, clean cuts. Another tip is to make sure your paper is secure. Use masking tape to keep it from shifting. When I first started, my paper was all over the place, sliding around, and my lines were terrible. So, a good mat, a ruler, and some masking tape are your best friends when you're trying to get those lines just right. And remember, practice makes perfect. The more you cut, the better you'll get at it.
Wrapping Up Your Paper Cutting Journey
So, you've reached the end of our paper cutting lines adventure. You've learned about the tools, mastered basic cuts, and even tackled some tricky designs. Remember, like any skill, paper cutting takes practice. Don't get discouraged by a few wobbly lines or accidental snags. Each cut, whether perfect or not, is a step forward. Keep experimenting with different papers, designs, and techniques, and you'll be amazed at what you can create. The most important thing is to enjoy the process and let your creativity flow. Now, go forth and make some awesome paper art!