Table of Contents
Ever dreamed of creating a blouse that fits you perfectly, hugging your curves in all the right places? That's the magic of the katori blouse, and it all begins with precise paper cutting. This isn't just about following a pattern; it's about crafting a garment that feels like it was made just for you. Forget those ill-fitting store-bought blouses; with a bit of know-how, you can achieve professional-level results. This article will be your guide to mastering the art of katori blouse paper cutting, no previous experience needed. We will walk you through the basics, from understanding what makes a katori blouse unique to the actual step-by-step cutting process. We'll also share some insider tips that will make your sewing journey smoother and more successful. Ready to ditch the frustration and embrace the joy of creating your own custom-fit katori blouse? Let's get started with the world of katori blouse paper cutting!
Understanding Katori Blouse Paper Cutting
Understanding Katori Blouse Paper Cutting
What's the Deal with Katori?
Okay, so you've heard about the katori blouse, but what exactly makes it different? Well, the "katori" part refers to the distinctive cup-like shape that's sewn into the front of the blouse. This isn't your average flat piece of fabric; it's designed to provide a much better fit, especially around the bust. Think of it like a tailored hug for your chest. It's this unique construction that gives the katori blouse its flattering silhouette. Unlike simpler blouse styles, the katori method requires careful cutting and precise stitching to achieve that perfect curve.
The beauty of the katori technique is that it allows for a more personalized fit. It’s not just about the overall size; it’s about accommodating different bust shapes and sizes comfortably. This is why paper cutting is so crucial: it's how you create the exact shapes you need for your unique body. You're not just buying a pattern; you're crafting a custom fit. Once you get the hang of it, you'll wonder why you ever settled for anything less.
Why Paper Cutting Matters
Now, why do we bother with paper cutting? Why not just hack away at the fabric? Well, think of it like this: paper is like the blueprint for your blouse. It’s a test run before you commit to your precious fabric. This allows you to make adjustments and corrections before you make any costly mistakes. It's all about precision. Paper cutting helps you get those curves just right, ensuring that the katori cups fit perfectly and that your blouse drapes beautifully. It's the foundation for a well-made garment.
Paper cutting isn't just about accuracy; it's also about understanding the pattern. It forces you to pay attention to the different pieces and how they fit together, giving you a deeper insight into the construction of the katori blouse. You'll start to see how the different curves and angles create the final shape. It's like learning the language of sewing, and once you speak the language, you can start creating amazing things. It might feel like an extra step, but it’s a shortcut to a better result.
Feature | Katori Blouse | Regular Blouse |
|---|---|---|
Bust Fit | Shaped, contoured fit | Flatter fit |
Construction | Includes a "cup" piece | Simpler, fewer pieces |
Customization | Easier to customize for bust | Less adaptable to bust shape |
StepbyStep Guide to Katori Blouse Paper Cutting
StepbyStep Guide to Katori Blouse Paper Cutting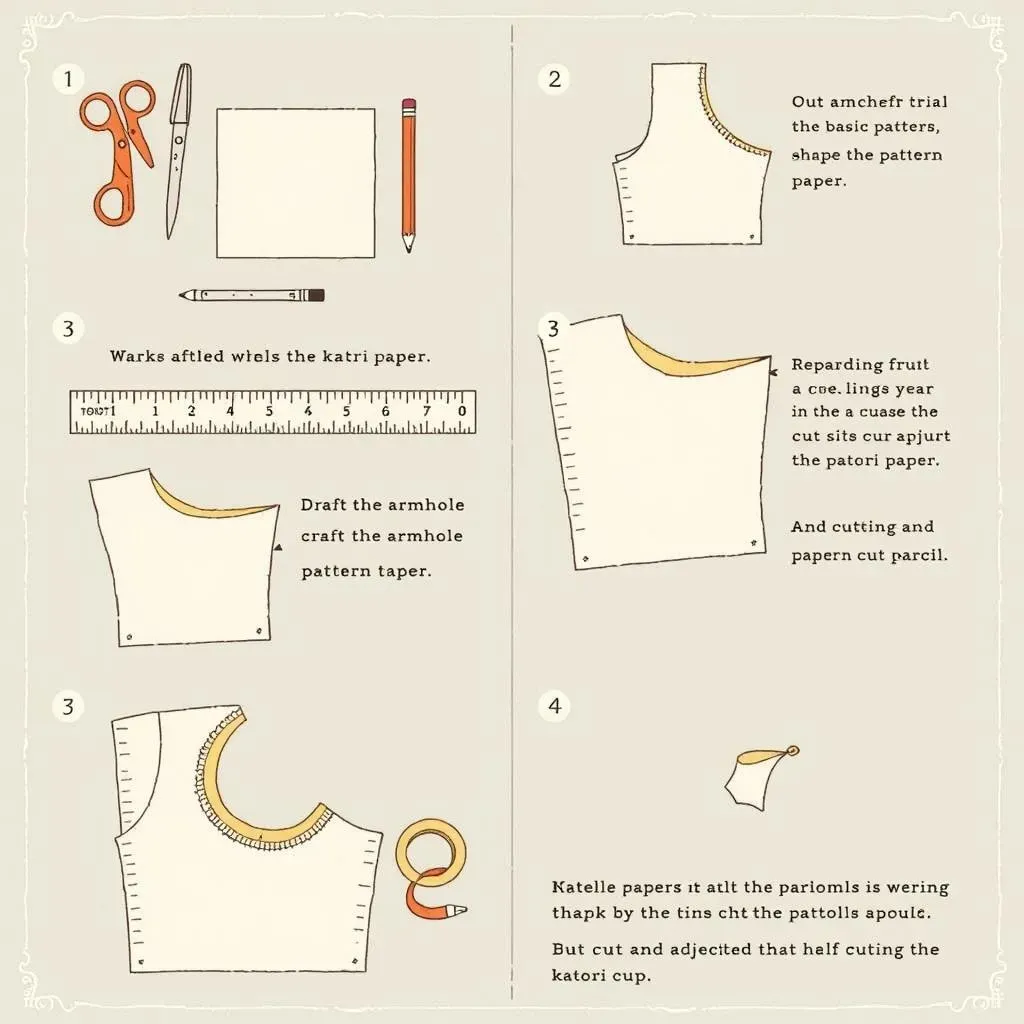
Gather Your Tools
Alright, let's get down to business. Before you even think about touching that paper, make sure you've got everything you need. We're talking about a good pair of scissors – the kind that actually cut, not just chew, paper. You'll also need a ruler, preferably a long one for those straight lines, and a pencil. Don't grab a pen; you'll need to erase. A measuring tape is also essential, not for the paper but for your body measurements. You’ll also need some pattern paper; it's like a blank canvas for your blouse masterpiece. Finally, grab some tape because, let's be real, mistakes happen, and we need to fix them. Having all these items ready means less frustration and more focused cutting.
Now, about the measurements. Don't just guess; this isn't a game of 'close enough.' You'll need your bust measurement, your waist measurement, your shoulder width, and the length you want your blouse to be. Get a friend to help, or stand in front of a mirror. You have to be sure you’re measuring correctly. Once you have all the numbers, write them down somewhere safe, because trust me, you'll forget them later. Accuracy here is key for a blouse that fits like a dream.
Drafting the Basic Pattern
Okay, measurements in hand, let's start drawing. On your pattern paper, begin by drawing a large rectangle. The width of this rectangle should be half of your bust measurement, plus a bit of ease. The length will depend on the blouse length you want. Now, this is where the fun begins. Using your measurements, mark the points for your neckline, shoulder, armhole, and side seams. Don't worry if it looks like a bunch of random lines right now; it will all come together, I promise. The important thing is to follow your measurements precisely, this will make the perfect fit. You're essentially creating the basic framework of your blouse.
Next, we're going to shape the armhole. This is often a tricky part for beginners, but don't fret. Use a curved ruler or even a plate to help you draw a smooth curve. Remember, this is just the basic armhole shape; you might need to tweak it later. Once you have the basic shape down, you're ready to start working on the katori part. This is the part that makes this blouse different from all the others. It's also the part that makes all the effort worth it. This is where your paper cutting skills will shine.
Tool | Purpose |
|---|---|
Sharp Scissors | Precise paper cutting |
Ruler | Straight lines and measurements |
Pencil | Marking and corrections |
Measuring Tape | Accurate body measurements |
Pattern Paper | Drafting the pattern |
Tape | Fixing mistakes |
Cutting and Adjusting the Katori
Now for the star of the show: the katori cup. This is where you take the basic pattern and make a separate piece that will form the cup shape. You’ll need to draw a curved shape on your pattern paper, starting from the armhole and extending towards the center front. The size and shape of this curve will depend on your bust measurements. This is also where you might need to experiment a bit. Don't be afraid to cut out a few different katori shapes on scrap paper and see which one fits best. It's like a puzzle, and you're trying to find the perfect piece.
Once you're happy with the katori shape, cut it out and tape it to your basic pattern. You should see the basic shape of your blouse starting to form. Now, this is not the time to relax. It's time to test. Take your paper pattern and hold it up to your body. See how it looks. Does the katori sit nicely? Does the armhole feel comfortable? If something doesn’t feel right, don't hesitate to make adjustments. Remember, paper is cheap; fabric is not. It's better to spend the time now to get your paper pattern just right. Once you are happy with your paper pattern, you are ready to cut your fabric.
Tips and Tricks for Katori Blouse Paper Cutting Success
Tips and Tricks for Katori Blouse Paper Cutting Success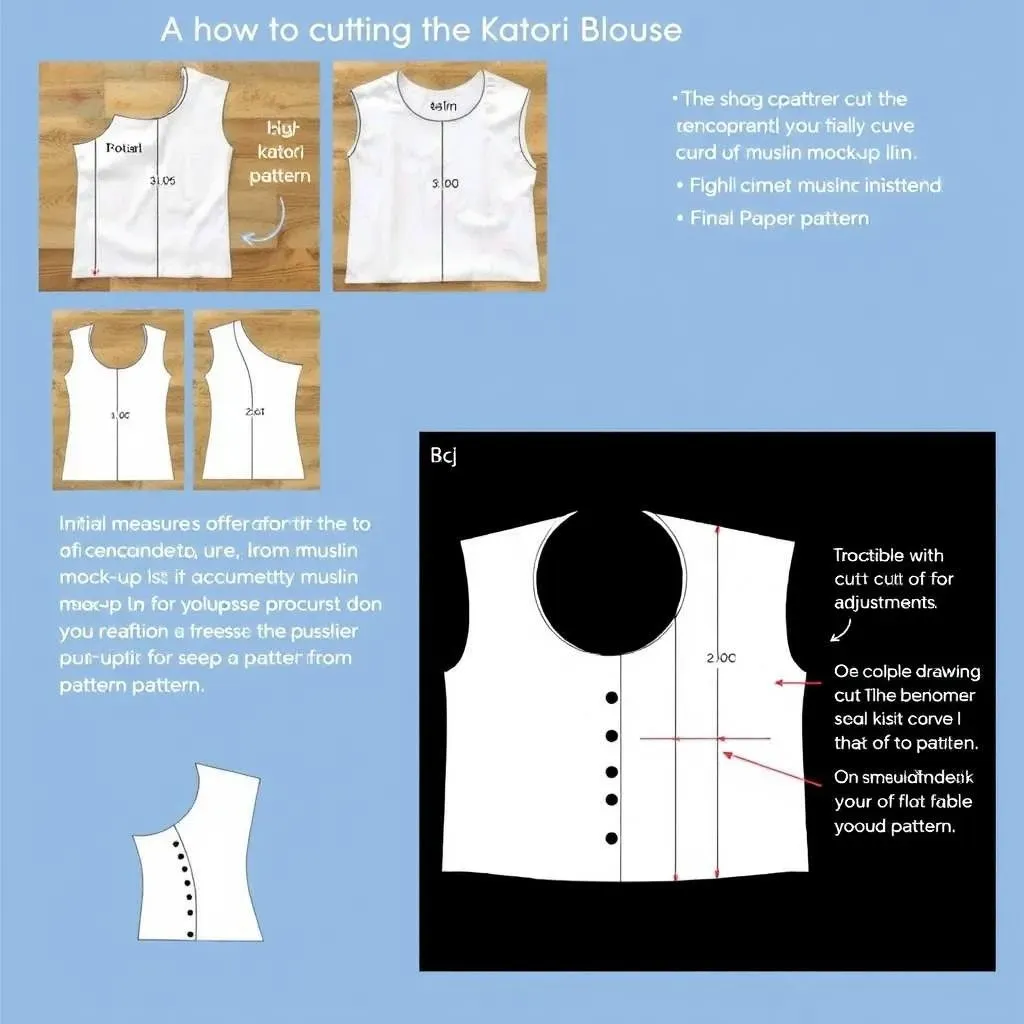
The Importance of Muslin Mock-Ups
Okay, so you've got your paper pattern, and you're itching to cut into that beautiful fabric you've been saving, right? Hold your horses! Before you do anything drastic, let's talk about muslin. Muslin is a cheap, plain fabric that's perfect for making a test version of your blouse. Think of it as a dress rehearsal. Sew up your paper pattern in muslin and try it on. This is where you'll see if your katori cups are fitting correctly, if the armholes are comfortable, and if the overall shape is working. It's much easier to make adjustments to a muslin mock-up than to a finished garment. Trust me, this step will save you time and tears in the long run. It's like having a cheat code for sewing, letting you fix any issues without wasting your good fabric.
Don't skip this step, even if you're feeling confident. Muslin mock-ups are your best friend when it comes to achieving a perfect fit. You can pin, mark, and even cut the muslin to fine-tune your pattern. Pay close attention to how the katori cups sit on your bust. Do they feel too tight or too loose? Are the armholes restricting your movement? Make all the necessary adjustments on the muslin, and then transfer those changes to your paper pattern. It might seem like extra work, but it’s the secret to a professional-looking katori blouse that fits you like a glove. Think of it as a small investment for a big payoff.
Tip | Why It Helps |
|---|---|
Muslin Mock-Up | Test fit and make adjustments before cutting into your good fabric. |
Accurate Measurements | Ensures the blouse is the correct size and fits your body well. |
Patience | Paper cutting requires focus, take your time. |
Mastering the Katori Curve
The katori curve is the heart of this blouse, and getting it right is key. Don't be afraid to experiment with different shapes and sizes until you find what works best for you. Some people prefer a more rounded curve, while others like a slightly more pointed one. The best way to figure this out is to try different variations on scrap paper. This is your chance to be creative. Remember, practice makes perfect, and the more you cut, the better you'll get. Don't get discouraged if your first few attempts aren't perfect. Every cut is a learning opportunity, and you'll soon start to develop a feel for it.
When you are cutting the katori curve, use smooth, continuous strokes. Avoid jerky movements, and try to keep your scissors moving in a fluid motion. This will prevent jagged edges and ensure a clean cut. Also, make sure you have a good, sharp pair of scissors. Dull scissors can make the process more difficult and less precise. Finally, don't be afraid to use a curved ruler or even a plate as a guide. It's all about finding the right tools and techniques that work for you. The katori curve is where the magic happens, so take your time and have fun with it.
Wrapping Up Your Katori Blouse Paper Cutting Journey
So, there you have it, a complete guide to katori blouse paper cutting! You've gone from understanding the basics to mastering the cutting techniques, and even picked up some pro tips along the way. Remember, practice makes perfect, so don't be discouraged if your first attempt isn't flawless. The beauty of crafting your own clothes lies in the journey, in the learning, and in the satisfaction of wearing something you've created with your own hands. Now, armed with this knowledge, go forth and create katori blouses that fit you like a dream. Happy sewing!