Table of Contents
Ever stared at those tricky paper cutting puzzles on IndiaBIX and felt like your brain was doing origami? You're not alone! These aren't your grandma’s paper snowflakes; they're designed to test your spatial reasoning and visualization skills. This article will be your guide, we will break down the seemingly complex world of indiabix paper cutting. We'll start with the fundamentals, then we will move to step-by-step methods for understanding how those folds and cuts transform into the final shapes. We will explore common patterns, provide example questions with detailed solutions, and share some killer tips and tricks. Think of it as a treasure map to mastering these puzzles. If you are prepping for competitive exams or just want to sharpen your mind, understanding indiabix paper cutting is a great skill. Let's get started and unfold the secrets together! Get ready to see the world of paper cutting in a whole new way, it will be fun I promise.
IndiaBIX Paper Cutting: Understanding the Basics
IndiaBIX Paper Cutting: Understanding the Basics
What's the Big Deal with Paper Cutting?
Okay, so you've seen those paper cutting questions on IndiaBIX, right? They might seem like some weird art project gone wrong, but they’re actually a clever way to test how well you can visualize things in your head. It's not about being a master paper crafter; it's about understanding how folding and cutting change a flat piece of paper. Think of it like a puzzle where the pieces are hidden until you unfold them. The core idea is to understand that every fold and cut has a specific impact on the final shape, and that's what we are trying to figure out.
They usually show you a sequence: a piece of paper gets folded, then a cut is made, and you have to imagine what the unfolded paper will look like. The challenge is that you only see the final folded and cut state. This is where your spatial skills come into play. You have to mentally undo the folding process and see how the cut is replicated when the paper is unfolded. This is the basic idea of what we are trying to solve in the IndiaBIX Paper Cutting challenges. It's like magic, but with logic.
Key Concepts in IndiaBIX Paper Cutting
When tackling these paper cutting problems, there are a few key things to remember. First, understand that each fold creates a line of symmetry. This means that a cut made on one side of the fold will be mirrored on the other side when unfolded. If you fold a paper in half, and cut a triangle on one side, when you unfold you will see two triangles. Second, pay close attention to the type of fold. Is it a half fold, a quarter fold, or something else? The type of fold will determine how many times the cut is replicated. Lastly, the position of the cut relative to the folds is crucial. A cut near the edge will create different results from a cut near the center.
These are the basic ideas, with these in mind, you can start thinking logically how to solve IndiaBIX Paper Cutting. Keep in mind that the goal is to see how the cuts will appear when the paper is unfolded. This requires a solid understanding of how each fold acts like a mirror, replicating the cuts across the paper. Once you understand these, you are already ahead of the game. This sounds like a lot of information, but I promise it will become second nature with practice.
Concept | Description | Impact on Unfolded Shape |
|---|---|---|
Folding | Creates a line of symmetry. | Cuts are mirrored across the fold. |
Type of Fold | Half, quarter, etc. | Determines how many times the cut is replicated. |
Cut Position | Location of the cut relative to the fold. | Affects the final pattern and shape of the cut. |
Visualizing Folds and Cuts: A StepbyStep Approach to IndiaBIX Paper Cutting
Visualizing Folds and Cuts: A StepbyStep Approach to IndiaBIX Paper Cutting
The Mental Unfolding Technique
Alright, let's get into the nitty-gritty of visualizing these paper cuts. The key here isn’t about being a mind reader; it's about having a system. When you see a folded piece of paper, start by mentally reversing the last fold. Imagine the paper opening up, and how any cuts would mirror across that fold line. If it was folded in half, the cut will replicate once, if it was folded in quarter, the cut will replicate three times. Don't try to see the entire unfolded paper at once; it's too much to handle. Instead, focus on one fold at a time and see how the cuts change with each unfold. It’s like watching a movie in slow motion, you are seeing each frame one by one.
For example, if you see a paper folded in half and then a triangle cut out, picture that triangle being reflected on the other side when the paper is unfolded. Next, mentally unfold the paper again by reversing the next fold. Keep repeating this process until you arrive at the unfolded state. This step-by-step method can make a seemingly complex problem much easier to understand. Breaking it down into smaller steps can be a game changer. This method isn't just for paper cutting, it can be used in other spatial problems. Practice this mental unfolding and you’ll start seeing patterns naturally.
Tracing the Cuts and Folds
Another useful technique is to trace the cuts and folds with your finger, either on the screen or, even better, on a real piece of paper. This kinesthetic approach can help solidify the mental image. Start with the last fold and trace the cut, then visualize how that cut would appear after the paper is opened up by reversing that fold. Use your finger as a guide to see how the cut line would continue. This helps to create a sense of movement and transformation, making it easier to predict the final unfolded pattern. If you are having trouble visualizing, then try this technique, it really helps.
I know it sounds like a lot of work, but trust me, it's not about being a paper-folding ninja. It is about building a solid mental framework. With tracing, you are creating a map for your mind to follow. It's like learning a dance routine; at first, it seems complicated, but with practice, it becomes fluid and natural. When you do this, you’re not just passively looking at the problem; you’re actively engaging with it. The more you practice, the faster and more accurately you’ll be able to predict how the cuts will look when the paper is fully unfolded. So grab a piece of paper, start tracing, and watch your spatial skills take off.
Step | Action | Purpose |
|---|---|---|
1 | Identify the last fold. | Focus on the most recent fold. |
2 | Visualize unfolding | See how cuts mirror across the fold. |
3 | Trace the cuts | Use your finger to guide the unfolding. |
4 | Repeat step 1-3 | Continue until fully unfolded. |
Practice Makes Perfect: Example Questions and Solutions for IndiaBIX Paper Cutting
Practice Makes Perfect: Example Questions and Solutions for IndiaBIX Paper Cutting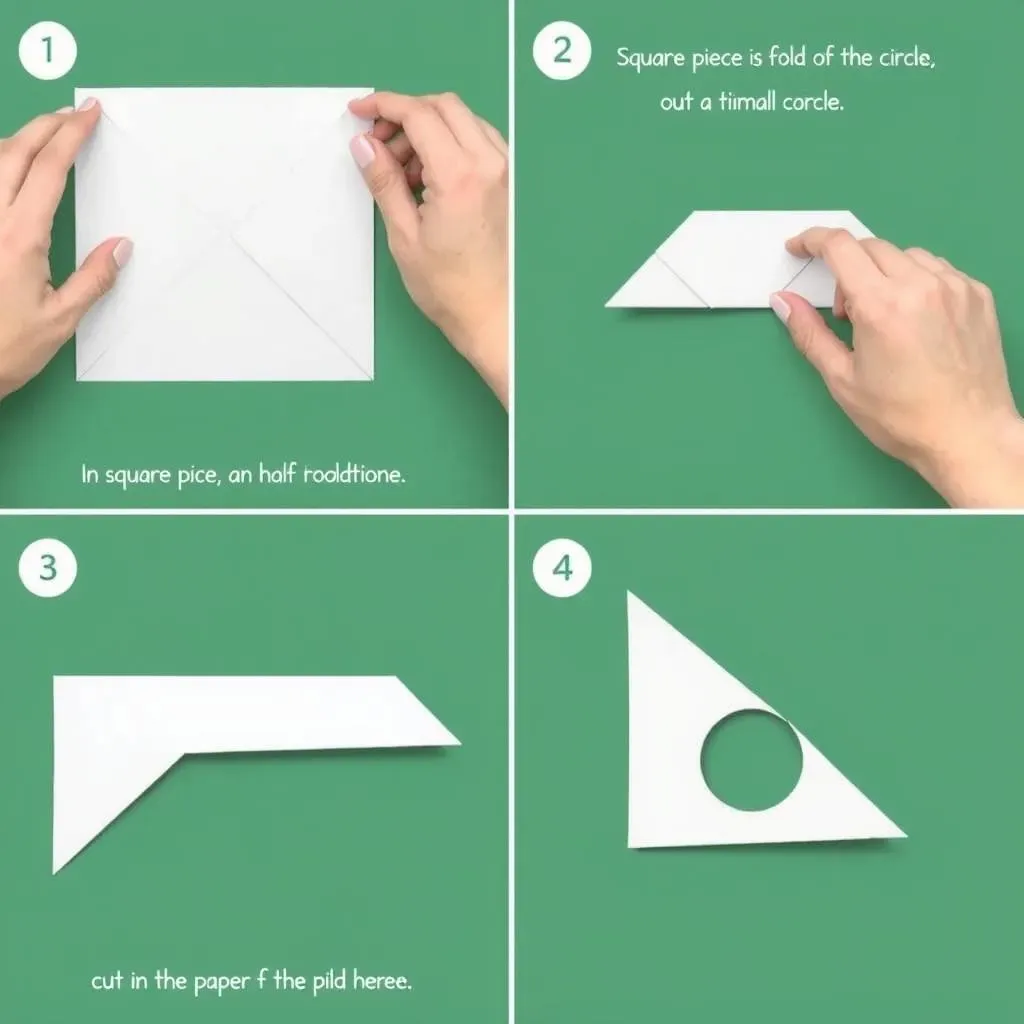
Time to Get Our Hands Dirty
Okay, enough talk about theories, let's jump into some real examples. I know you are itching to see how it works in practice. Let's tackle some actual IndiaBIX paper cutting questions. This is where the rubber meets the road. We will show you how to apply the mental unfolding and tracing techniques we have discussed. These examples will show you how to break down the problem and get to the solution. We will walk you through each step, so don't worry if you feel overwhelmed. Remember, the key to mastering anything is consistent practice, so let's start practicing.
Each example will have a step-by-step solution. I'll show you how to identify the folds, how to visualize the cuts, and how to trace the cuts to see what the final unfolded paper will look like. Think of it like a guided tour through a paper cutting maze. The goal here isn’t just to get the right answer; it’s to understand the process. By seeing how these problems are solved, you'll start to develop your own mental strategies. I know that with enough practice, you will begin to see patterns and predict the outcomes more easily. This is where the real learning happens.
Example Question 1
Let's start with something simple. Imagine a square piece of paper. It's folded in half once, then folded in half again. Now, a small circle is cut out from the folded corner. What does the unfolded paper look like? Remember, we need to reverse the folds one by one. First, you unfold the last fold, you will see two circles. Then you unfold the first fold, you will see four circles. Now, let's try a different one.
Let's imagine a square piece of paper. It is folded in half diagonally, creating a triangle. Then, a small square is cut out from the middle of the triangle. What does the unfolded paper look like? If you unfold the triangle, you will see the square is replicated, creating a diamond shape in the middle. If you are having problem visualizing, then try to trace the fold and the cut. It always helps me. This shows you that the shape is replicated, not just mirrored. Now, let's move to a slightly more complex example.
Step | Action | Outcome |
|---|---|---|
1 | Fold in half once, then in half again. | Paper is folded into a smaller square. |
2 | Cut a circle from the folded corner. | A circular cut is made through all layers. |
3 | Unfold the last fold. | Two circles appear. |
4 | Unfold the first fold. | Four circles appear. |
Example Question 2
Now, let’s tackle a slightly more complex problem. Imagine a square piece of paper folded in half, and then folded in half again. This time, a small triangle is cut out from the edge of the folded paper. What will the unfolded paper look like? Again, we need to reverse the folds. Unfolding the last fold, we get two triangles. Then, when we unfold the first fold, we see four triangles. Remember, the cuts are mirrored across the fold lines.
Let’s try another one. Suppose a square paper is folded diagonally to make a triangle, and then a small rectangle is cut out along one of the edges. When the triangle is unfolded, the rectangle is replicated, creating a diamond. You see? Once you understand the basic method, you can solve complex problems easily. The trick is to take your time, visualize the folds and cuts in your mind, and then trace them if you need to. And always remember, practice makes perfect!
- Start with the last fold and mentally reverse it.
- Trace the cuts and see how they mirror.
- Repeat the process for each fold until fully unfolded.
- Use a piece of paper to test your visualization.
Tips and Tricks for Success in IndiaBIX Paper Cutting Challenges
Tips and Tricks for Success in IndiaBIX Paper Cutting Challenges
Practice Regularly and Systematically
Alright, so you've got the basics down, you know how to mentally unfold and trace those cuts. Now, the real secret to success? It's all about practice, practice, and more practice! But not just any practice; you need to be smart about it. Don't just randomly look at paper cutting problems. Start with easier ones and gradually work your way up to the more complex stuff. Try to solve at least a few problems every day, this will help your brain get used to the patterns, the folds, and the cuts. It's like learning a new language, the more you use it, the better you become.
Consistency is key, small amounts of practice often are much better than one long practice session once a week. Also, track your progress. See which types of problems you struggle with. Is it the diagonal folds? Or cuts near the center? Knowing your weaknesses will help you focus your efforts. Don't just solve, analyze what you did right and wrong. This will help you learn from your mistakes. It is important to understand the methods, but it is also important to understand your own thinking process.
Use Real Paper for Hands-on Practice
Okay, I know staring at the screen is convenient, but trust me, nothing beats actually folding and cutting real paper. This is where you go from theory to real-world experience. Grab some scrap paper and try to replicate the folds and cuts you see in the IndiaBIX questions. It's like learning to swim, you can read about it all day, but until you get in the water, you won't really know how to do it. You are engaging with the problem in a physical way, this will solidify your understanding. This will help you develop a better spatial sense, and will be easier to visualize.
Also, try to create your own paper cutting problems. This will force you to think about the process in reverse. It will also help you understand the logic behind the folds and cuts. It is like being a chef, you don’t just follow recipes, you create your own. By creating your own problems, you are training your mind to think like a paper cutting puzzle maker. And remember, the goal is not perfection, it is progress. Each fold and cut teaches you something new.
Tip | Description | Benefit |
|---|---|---|
Regular Practice | Solve problems daily, starting with easier ones. | Builds familiarity and improves speed. |
Analyze Mistakes | Understand what you did wrong. | Helps to improve your weak points. |
Use Real Paper | Physically fold and cut paper. | Solidifies mental understanding. |
Create Problems | Make your own paper cutting puzzles. | Improves understanding of folding/cutting. |
Look for Patterns and Shortcuts
As you practice more, you'll begin to notice certain patterns. For instance, a cut made through the center of a folded paper often creates a mirrored pattern. Another example is that cuts near the edge of the fold will replicate differently than cuts near the center. These patterns can act as shortcuts, they can save you time and energy on test day. It's like learning to play a video game, once you know the tricks, you can beat the game more easily. The goal is to become a pattern-spotting machine. This is where the real skill comes from, you are now using your brain to process information more efficiently.
Also, remember to use process of elimination. If you can mentally eliminate a few answer choices quickly, it will save time and focus. This is a great strategy for test taking. Sometimes it is easier to identify what's wrong than to find what's right. This is like being a detective, you are using your logic to rule out the incorrect answers. Don't just jump to the solution, take a moment to see if there are any obvious mistakes in the answer choices. These shortcuts will make you faster and more accurate. This is how you become a paper cutting master.
Stay Calm and Focused
Now, here’s a secret that applies to every test, not just paper cutting: stay calm. If you get stressed, your brain will not perform at its best. When you are relaxed, you can think more clearly and make better decisions. It's like being a race car driver, if you are calm and focused, you can drive more smoothly and faster. If you are panicking, you will likely make mistakes. So, take a deep breath, and focus on the problem. Don't try to rush, take your time and think logically.
Also, it is important to stay focused. It is easy to get distracted by the time limit. Remember, the goal is not to be the fastest, but to be accurate. If you spend the time to truly understand each problem, you will be much more accurate. It is better to solve fewer problems correctly than many problems incorrectly. Each problem is a chance to practice and learn something new. So, put yourself in the right mindset and you will do great. Always remember, you have the tools, you have the knowledge, and you have the skills to succeed.
- Look for patterns in folds and cuts.
- Use the process of elimination to narrow down choices.
- Practice in a quiet place to stay focus.
- Take deep breaths to stay calm.