Table of Contents
Ever looked at intricate paper art and thought, "Wow, I wish I could do that?" Well, guess what? You totally can! Forget complicated crafts; we're diving into the world of easy paper cutting. It's not about being a master artist; it's about having some fun with a blade, paper, and a bit of imagination. This article will walk you through everything you need to know to create your own paper masterpieces, even if you think you have the artistic skills of a potato. We'll start with the basics, gathering your tools, and then move onto the step-by-step process of making your first cut. Don't worry if things get a little wobbly at first; we've got tips and tricks to help you along the way, including how to fix those oops moments. By the end, you'll not only have a beautiful paper cut but also the confidence to keep experimenting. So, grab your supplies, and let's get snipping!
Gathering Your Tools for Easy Paper Cutting
Gathering Your Tools for Easy Paper Cutting
The Essential Toolkit
Okay, so you're ready to start your paper-cutting adventure? Awesome! First things first, you gotta gather your supplies. It's like prepping for a cooking show, but instead of a whisk, you'll need a scalpel, and instead of ingredients, you'll need paper. Don't worry, it's not as intense as it sounds. You'll need a cutting board to protect your table, a sharp scalpel (those craft knives with replaceable blades are perfect), some card or paper to cut, and a glue stick to put your finished design on. Oh, and masking tape, a ruler, and an image to cut out. Think of it as your paper-cutting starter pack.
Now, about the scalpel – this isn't the time for dull blades! A sharp blade is your best friend, not your enemy. It'll glide through the paper like a hot knife through butter. Flexible blades are great because they let you navigate those tricky curves. And the paper? Choose something that isn't too thick, or you'll be wrestling with it all day. But don't go too thin, or it will be too fragile. It's all about finding that sweet spot that makes the cutting easy but can still hold its shape. You'll figure it out after a few tries, I promise.
Tool | Why You Need It |
|---|---|
Cutting Board | Protects your work surface from cuts. |
Scalpel/Craft Knife | For precise and clean cuts. |
Card or Paper | Your canvas for paper cutting. |
Glue Stick | To attach your finished design. |
Masking Tape | To hold down paper or fix mistakes. |
Ruler | For straight lines and measuring. |
Image to Cut | Your guide for the design. |
Making Smart Choices
Let’s talk paper thickness. It’s a bit like Goldilocks and the three bears – you don’t want it too thick, too thin, but just right. Thicker card can be a pain to cut, making your hands ache, while super thin paper is a nightmare to handle, ripping at the slightest touch. I’ve made that mistake more times than I care to admit. I usually go for something like 160-200gsm cardstock. It’s sturdy enough to hold its shape, but still easy enough to cut through without feeling like you’re doing a full-body workout.
And don't underestimate the importance of your cutting mat. It's not just a piece of plastic; it's your shield against accidental table art. Plus, it provides a nice, even surface for cutting. Honestly, I once tried cutting on a magazine, and, well, let's just say my table has never forgiven me. So, grab a decent mat, and your furniture will thank you. And you know what? Maybe get a spare blade or two, you'll thank me later.
StepbyStep: Making Your First Easy Paper Cut
StepbyStep: Making Your First Easy Paper Cut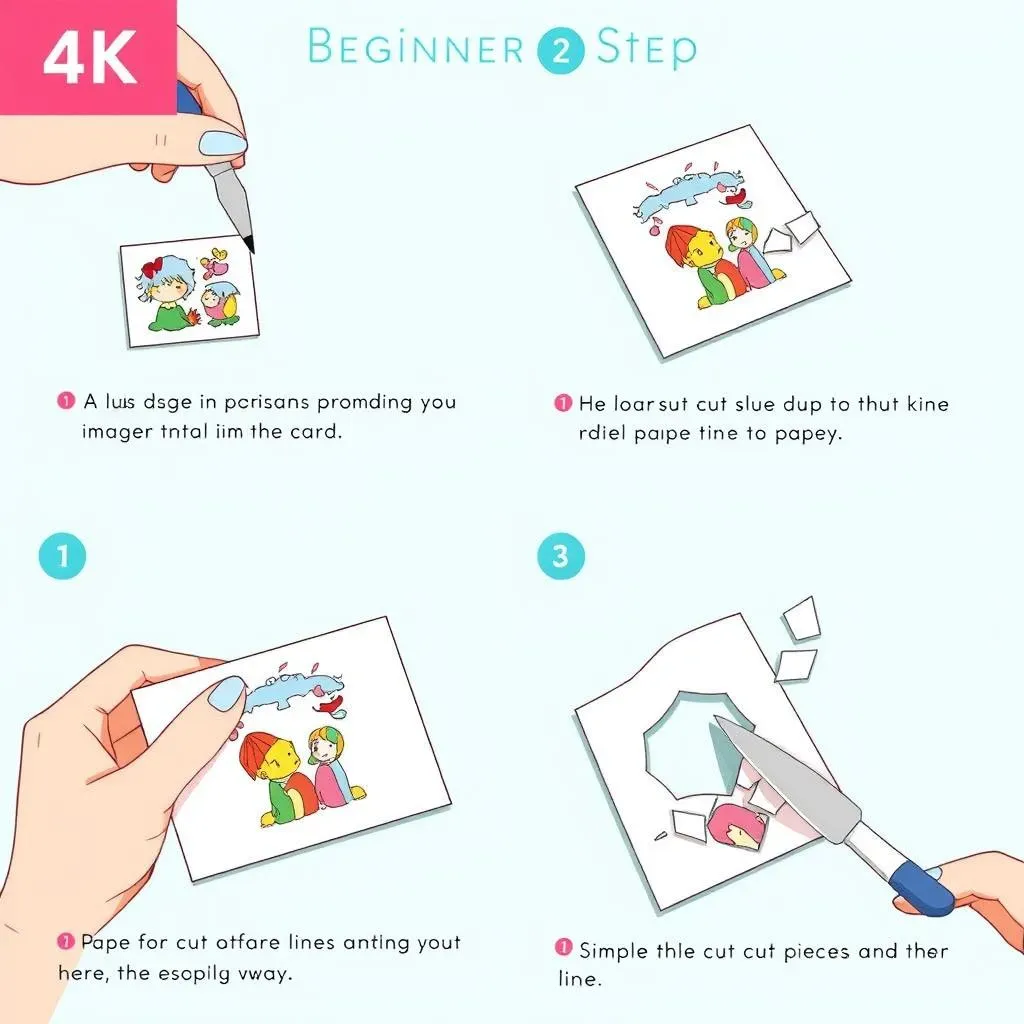
Getting Ready to Cut
Alright, you've got your tools, now it's time to get cutting! First, you need to prep your card. Take your glue stick and apply a thin layer all over the back of your image. Don’t go crazy with the glue, you only need a light coat, not a full-on sticky situation. Think of it like buttering toast, just enough to get it to stick. Then, carefully place the glued image onto your chosen card. Smooth it down with your hand, making sure there are no bubbles or wrinkles. This step is crucial because you want your design to stay put while you’re cutting. If you're using a pre-printed design, you can skip this gluing bit and just tape the corners to the card; it’s all about what works best for you.
Before you even think about picking up that scalpel, you need to think about your design. Look at the image you’re going to cut out. Notice how every piece needs to be attached to the larger image in at least three places? This is not some weird paper-cutting rule, it’s to keep the design intact, so that you don’t end up with a pile of paper confetti. If it's not connected, it'll just fall out. Imagine it like the roots of a tree; they need to be connected to the trunk to hold everything together. So, make sure your design has those connections in place before you start cutting.
Let the Cutting Begin
Okay, now for the fun part – cutting! Start by carefully following the lines of your design. Hold your scalpel like a pen, not like you’re about to stab something. Gentle pressure is key here; let the sharp blade do the work. You don’t need to saw at the paper; a smooth, steady motion is much better. I like to cut in small sections, lifting the blade and starting again, rather than trying to cut one long line. It’s like drawing – short, controlled strokes give you better results than one long, shaky one. And remember, patience is your best friend here. Don’t rush it, or you’ll end up with a mess.
As you cut, start removing the little pieces of card you’ve cut out. Some will fall out on their own, but others might need a little help. Use the tip of your scalpel to gently lever them out, or if they’re being stubborn, you can carefully ‘stab’ the corner with the tip of your knife to get them to pop out. Don't go all Edward Scissorhands on it, though; we're aiming for precision, not a paper massacre. Keep removing those pieces as you go, it’ll make it much easier to see what you’re doing and reduce the chance of accidentally cutting the wrong bit.
Step | Action |
|---|---|
1 | Apply a thin layer of glue to the back of your image. |
2 | Place the glued image onto your card and smooth it out. |
3 | Examine your design, ensuring every piece is connected. |
4 | Start cutting along the lines with smooth, controlled strokes. |
5 | Remove cut-out pieces as you go. |
Easy Paper Cutting: Tips, Tricks, and Troubleshooting
Easy Paper Cutting: Tips, Tricks, and Troubleshooting
The Fiddly Bits
Okay, so you're cutting away, feeling like a paper-cutting pro, and then BAM! You hit those tiny, fiddly bits. You know, the small circles, sharp corners, and delicate lines that seem designed to test your patience? These are where things can get tricky, but don't panic, it's all part of the fun. When you're facing a tight corner, instead of trying to turn the scalpel, try moving the paper. It’s like you are dancing with the paper, letting it guide your blade. This will give you much more control and help you avoid those accidental snags. Trust me, it's a game changer. It's all about precision and a steady hand.
And what about those tiny circles? Well, those can be a real pain, I know. The trick is to cut in a spiral motion, starting from the outside and working your way in. It's like you're drawing a snail shell, slowly and carefully. Don’t try to cut the whole circle in one go, you’ll likely end up with a jagged mess. Small, controlled cuts are the key. Think of it like a tiny paper surgery; you're a surgeon of the paper world.
Tight Corners
Tight corners are the paper-cutter's nemesis, but they don't have to be. When you approach a tight corner, slow down. I mean, really slow down. It's like trying to parallel park in a tiny space; you need to be precise. Instead of trying to force the scalpel to make a sharp turn, try moving the paper around the blade. This lets you keep the blade steady and reduces the risk of tearing. It takes a bit of practice, but it's a technique that will save you a lot of frustration. I know I've definitely had my fair share of paper-cutting mishaps trying to rush these parts.
Also, make sure you're using a fresh blade. A dull blade will tug and tear at the paper, making those tight corners a nightmare. It’s like trying to cut a tomato with a butter knife; it's just not going to work. A sharp blade will glide through the paper with ease, giving you the clean, crisp corners you’re aiming for. So, before you start, check that blade and swap it out if needed. It’s a small thing that makes a big difference.
Problem | Solution |
|---|---|
Fiddly Bits | Move the paper, not the scalpel. |
Tight Corners | Slow down and use a fresh blade. |
Small Circles | Cut in a spiral motion from outside in. |
When Things Go Wrong
Let’s be honest, even the most experienced paper cutters mess up sometimes. It's part of the process, so don't beat yourself up about it. Sometimes you’ll make a wrong cut, or a piece will tear. This doesn’t mean your project is doomed. One of the easiest ways to fix a mistake is to use sticky tape. Just carefully apply a small piece of tape to the back of the card to hold the torn piece together. It’s like a paper bandage, simple but effective. If the tear is too big for tape, you can use a small piece of card and glue it over the break. It's like patching up a hole in your jeans, only with paper.
Also, don't be afraid to take a break. Sometimes when you are focusing too hard, you might be more prone to make mistake. If you're feeling frustrated or your hands are starting to ache, stop what you’re doing, stretch your hands, and take a breather. Come back to it with fresh eyes, you might be surprised how much easier it seems. It’s like when you’re stuck on a puzzle, sometimes you just need to step away for a bit and then the solution suddenly becomes clear. And remember, no one is going to look at your paper cut under a microscope. A few minor imperfections just add to its charm.
Finishing and Displaying Your Easy Paper Cutting Masterpiece
Finishing and Displaying Your Easy Paper Cutting Masterpiece
Final Touches
So, you've spent time carefully cutting out all those intricate details, and now it’s time to bring your paper-cutting project to life. Before you go sticking it on the fridge, take a moment to admire your work and make sure all the little pieces are properly removed. Sometimes a tiny piece will still be hanging on, and you don’t want that ruining your masterpiece. Gently use your scalpel to tease out any stubborn bits. It’s like a final clean-up before the big reveal. Once you are happy that all of it is clean and tidy, you can move on to the next step.
Now, grab your glue stick and apply a thin layer of glue to the back of your paper cut design. Remember, less is more here; you don't want to end up with a gluey mess. Carefully place it onto your chosen card or background, smoothing it down with your hand. If you are using a frame, now is the time to put it in. Make sure it all fits nicely, and then you're ready to show off your creation. It’s like putting the final touches on a painting; it's all about presentation.
Step | Action |
|---|---|
1 | Remove any remaining small pieces. |
2 | Apply a thin layer of glue to the back of your design. |
3 | Carefully attach it to your chosen background. |
Displaying Your Art
Alright, your paper cut is done, it looks amazing, and now you’re probably wondering, “Where do I put this thing?” Well, the options are pretty endless. You could frame it and hang it on the wall, which is always a great way to show off your hard work. Or you could stick it on a greeting card for someone special, adding a personal touch to your gift. I’ve even seen people use paper cuts to decorate their notebooks or phone cases, which is a cool way to customize your everyday stuff. It really comes down to what you like and how you want to share your creativity with the world.
Another great idea is to create a paper cut mobile. Use string or thread to hang your paper cuts from a hoop or branch, creating a beautiful, whimsical display. It's like a mini art installation, and it's super easy to make. You can also use your paper cuts to make stencils for other craft projects, like fabric painting or decorating furniture. The possibilities are endless, and it’s all about experimenting and having fun. Remember, your paper cut is a little piece of art, so be proud of what you have created and show it off.
Extra Tips
Before I let you go off and start your paper-cutting empire, here are a few extra bits of advice. Firstly, practice makes perfect, so don’t get discouraged if your first few attempts aren’t exactly gallery-worthy. Each time you cut, you'll get better at it. Secondly, take breaks. I know I said it before, but it’s worth saying again. Paper cutting can be quite intense, so give your hands and eyes a rest. And finally, don’t be afraid to experiment. Try different paper types, different designs, and different techniques. It’s all about finding your own style and having fun with it. Trust me, once you get the hang of it, you’ll be hooked.
So, there you have it – everything you need to know to start your paper-cutting journey. It’s a fun, relaxing, and creative hobby that anyone can enjoy, no matter their skill level. So grab your scalpel, some paper, and let your creativity shine. And don't forget to show off your masterpieces, I can't wait to see what you create!